
Keep Your Slab Bone Dry with Easy Concrete Roof Leak Fixes
Stop Concrete Roof Leaks Before They Damage the Slab
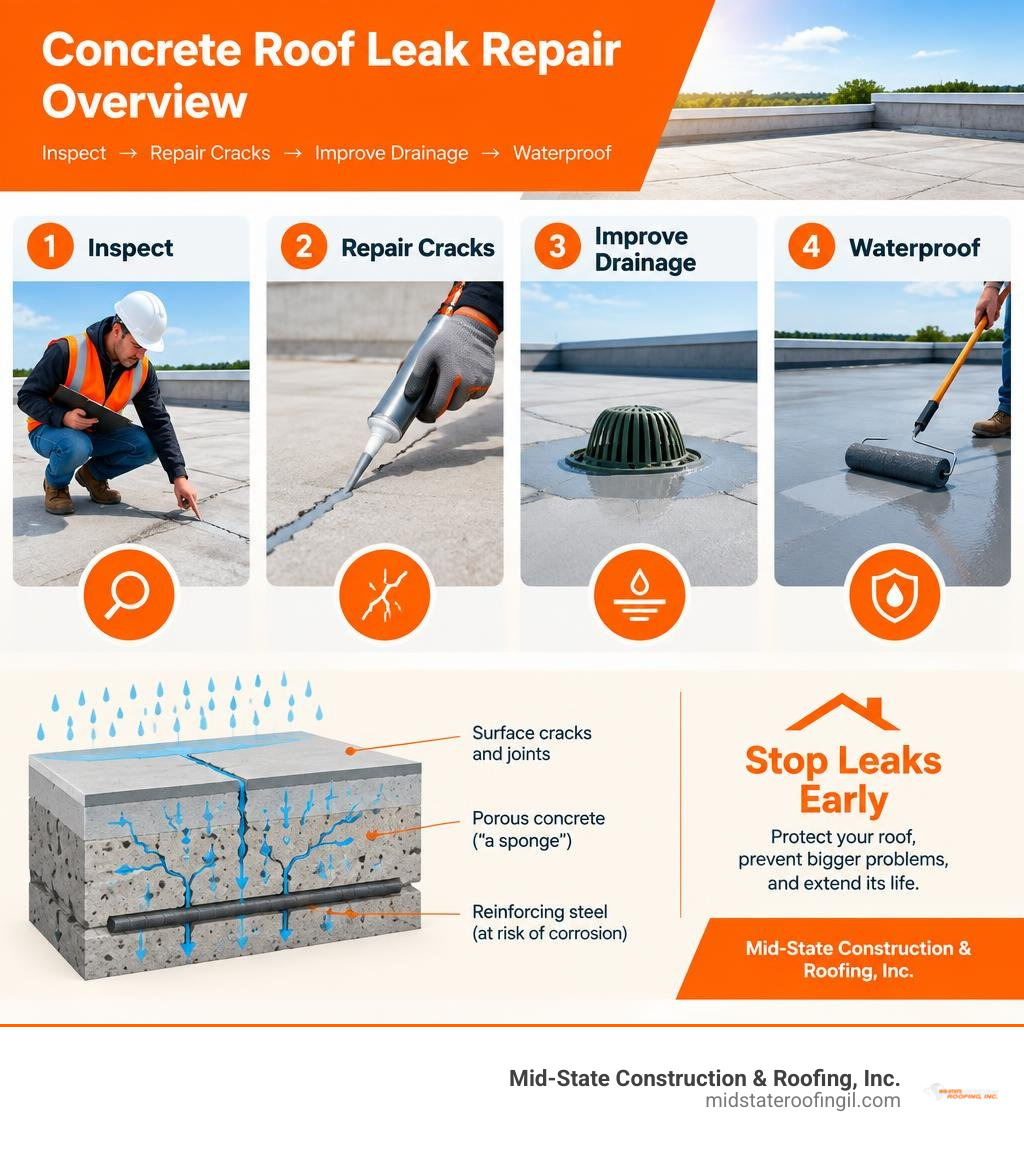
The best concrete roof leakage solution starts with finding the entry point, repairing cracks or failed joints, and then applying a waterproof system across the prepared roof surface. For a small, isolated crack, clean and dry the area, open the crack into a V-shape, fill it with a compatible flexible sealant or repair mortar, prime as required, and coat the surrounding surface. If water is pooling, fix the drainage or low spot first – a coating alone cannot solve standing water for long.
Concrete is strong, but it is not naturally waterproof. Water can move through tiny pores, cracks, flashing around pipes and vents, parapet-wall joints, and worn coatings. It may also travel sideways within the slab, so a ceiling stain is not always directly below the leak.
Act quickly if you see damp spots, peeling paint, white mineral deposits, mold, spalling concrete, or water remaining on the roof after rain. Early repairs help keep moisture away from reinforcing steel, where corrosion can create more cracking and larger repair costs.
I am Virgil Strauch, a business leader with practical experience in planning, operations, and long-term property decisions. In this guide, I will help you weigh each concrete roof leakage solution with a focus on durable repairs, sensible maintenance, and knowing when professional help is the safer choice.
Common Causes of Concrete Roof Leaks and How to Locate Them
Concrete is essentially a very rigid sponge. When mixed, excess water evaporates out of the wet slurry, creating a complex web of microscopic capillary pores. If the water-cement ratio is too high (typically above 0.5 to 0.6), those pathways become even wider, allowing moisture to wick into the material through simple capillary action. Add daily thermal expansion, structural settlement, and harsh seasonal weather across Central Illinois, and that rigid slab develops hairline fractures that welcome rainwater inside.
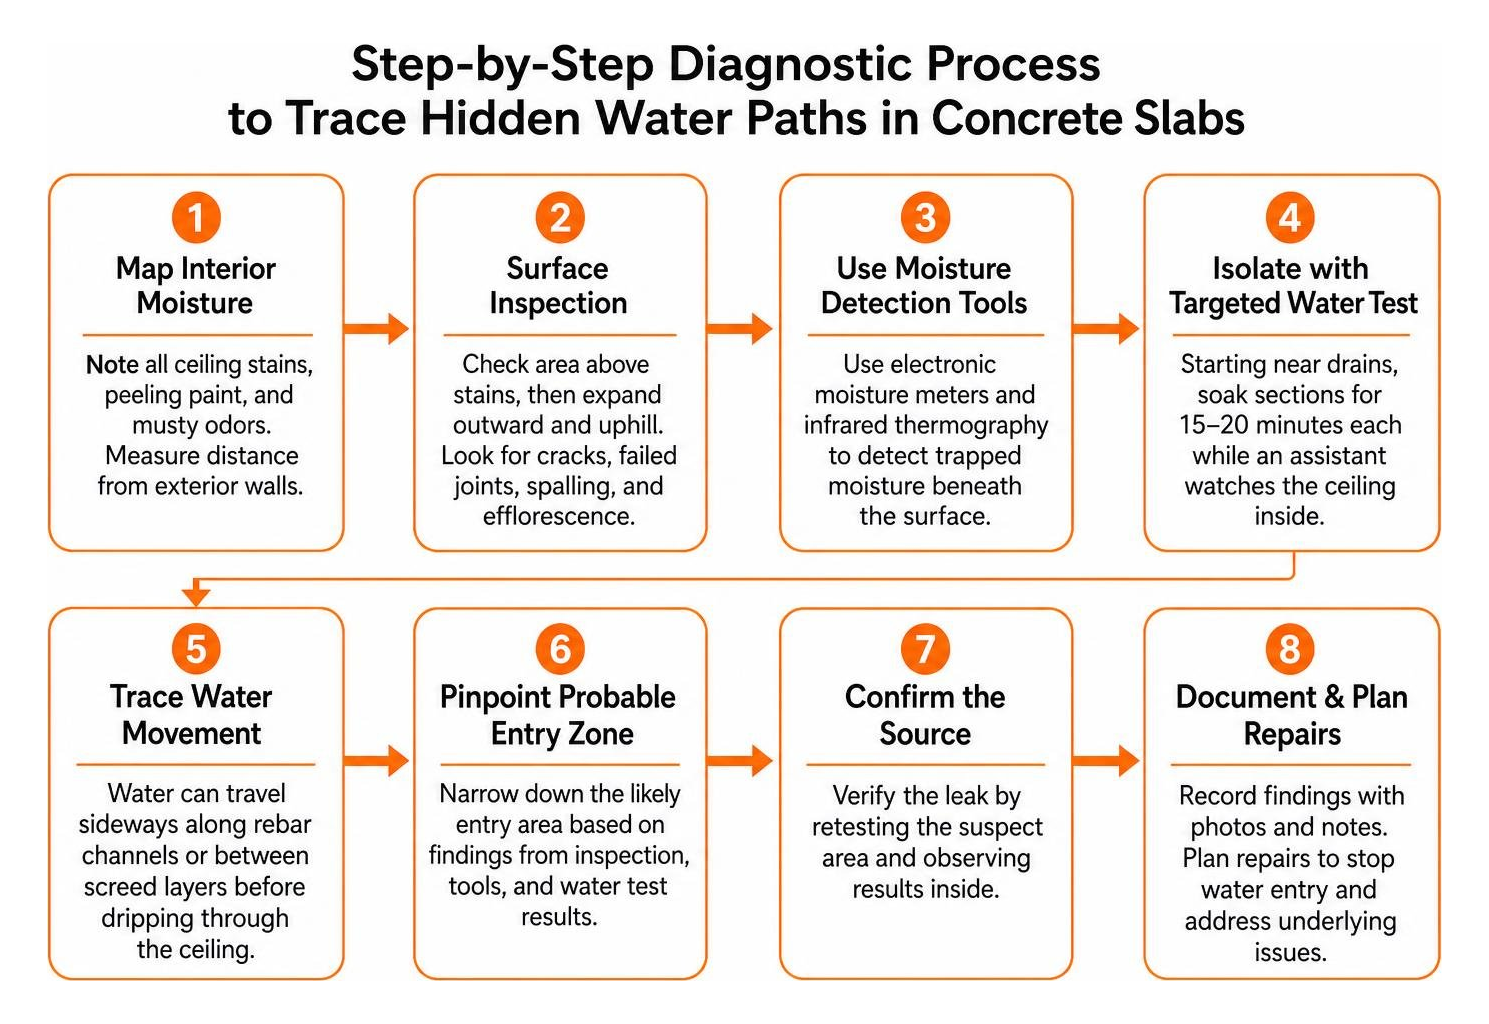
Locating the exact point of water entry can feel like detective work. Because concrete contains interior voids and layers, water rarely travels straight down. Instead, it follows the path of least resistance—migrating horizontally for twenty feet or more along rebar channels or between screed layers before dripping through your ceiling.
To find the source accurately:
- Conduct an interior moisture mapping: Note every ceiling stain, peeling patch of paint, or area with musty odors. Measure the distance from exterior load-bearing walls.
- Perform a systematic surface inspection: Head to the roof and check the area directly above the stains, then expand your search outward in an uphill radius. Look for fine spiderweb cracks, failed expansion joints, spalling (flaking concrete), and white powdery mineral trails known as efflorescence.
- Use electronic moisture meters and infrared thermography: A thermal imaging camera reveals temperature differences caused by trapped moisture under the roof surface long before water drips onto the floor below.
- Isolate with a targeted water test: Starting at the lowest point near the roof drains and moving slowly upward, soak isolated sections of the slab with a garden hose for 15 to 20 minutes each while an assistant watches the ceiling inside.
Identifying Interior Stains and Slab Porosity
When water infiltrates concrete, it leaves distinct fingerprints inside your building:
- Efflorescence: As water travels through the concrete matrix, it dissolves free lime and mineral salts. When the water evaporates at the ceiling surface, it leaves behind a chalky white crust—sometimes jokingly called the slab’s “salt-sprinkled frosting.”
- Musty odors and mildew: Lingering moisture trapped within porous concrete creates an ideal breeding ground for organic growth, producing stale, musty smells before visible mold spots break through interior drywall.
- Paint blisters and peeling: Moisture vapor trying to escape the slab pushes outward, breaking the adhesive bond between your ceiling paint and the concrete substrate.
- Spalling: When internal rebar comes into contact with water and oxygen, it rusts. Rust expands up to six times the volume of the original steel, generating massive internal hydrostatic pressure that pops off chunks of the concrete surface from the inside out.
Tracing Hidden Cracks and Flashing Failures
The wide-open flat sections of your roof are rarely the only culprits. More often than not, leaks begin where the concrete meets another material or plane:
- Parapet-wall transitions: The 90-degree angle where the flat slab meets a vertical parapet wall undergoes tremendous shear stress during temperature swings. Without a flexible cant strip and proper termination flashing, seams open up rapidly.
- Roof penetrations: HVAC units, plumbing vent stacks, conduits, and drain bowls vibrate and expand at different rates than the concrete slab. If the sealing collars or elastomeric flashings around these penetrations dry out and crack, water pours straight into the building core.
- Scupper and drain blockages: When roof drains clog with leaves and debris, water backs up. As the pond deepens, water reaches higher than the vertical waterproofing turn-ups on the parapet walls, exploiting unsealed brick, mortar joints, and coping seams.
Step-by-Step Methods to Repair Cracks, Holes, and Drainage Issues
To achieve a permanent fix, you must prepare the substrate meticulously. Applying a sealant over dirty, dusty, or crumbling concrete is the most common DIY mistake and leads to immediate bond failure. In fact, surface preparation accounts for roughly 80% of a repair’s long-term success.

Before beginning your repairs, gather the right equipment:
- Pressure washer (2,500 to 3,000 PSI) or stiff wire brush
- Angle grinder with a diamond masonry V-blade
- Hammer and cold chisel
- Shop vacuum or leaf blower
- Non-shrink polymer-modified hydraulic repair mortar
- High-grade elastomeric or polyurethane joint sealant
- Concrete bonding primer
- 45 gsm glass-fiber reinforcement mesh
- Trowel, putty knife, and heavy-duty caulking gun
- Personal protective equipment (safety goggles, dust mask, gloves)
Step-by-Step DIY Concrete Roof Leakage Solution for Small Cracks
For static cracks and non-structural splits under 1/4-inch wide, follow this reliable repair process:
- Chase and open the crack: Using an angle grinder or hammer and chisel, open the crack along its entire length into a clean “V” or “U” profile roughly 1/2-inch wide and 1/2-inch deep. This profile gives the repair material adequate surface area to grip.
- Clean thoroughly: Remove all loose aggregate, dust, moss, and debris using a wire brush and shop vac. Wash the channel with clean water to remove micro-dust.
- Apply a bonding agent: Brush an acrylic or epoxy concrete bonding primer directly into the opened groove to prevent the dry slab from drawing moisture out of the patch prematurely.
- Fill the channel: For non-moving cracks, pack the groove tightly with polymer-modified repair mortar, smoothing it flush with a trowel. For dynamic cracks subject to thermal movement, gun a high-performance polyurethane or elastomeric sealant into the joint, tooling it slightly concave.
- Bridge the repair: Once the base fill sets, apply a 4-inch wide strip of liquid elastomeric coating over the joint, embed a strip of glass-fiber mesh into the wet coat, and cover it with a second coat to create an elastic, crack-bridging bridge.
Correcting Low Spots and Standing Water
Standing water—commonly called ponding—is defined as water that remains on a flat roof for longer than 48 hours after rainfall. Ponding creates continuous hydrostatic head pressure, accelerating chemical breakdown of the surface and adding tremendous weight to your building structure. A one-inch deep puddle across a 1,000 sq. ft. area adds approximately 5,200 pounds of dead load to your roof deck!
To resolve localized low spots and poor drainage:
- Establish minimum slope: Flat roofs must maintain a positive slope toward drains—ideally a minimum pitch of 1:80 (1/4-inch of fall per horizontal foot).
- Apply leveling screeds: Clean the depression, apply a specialized bonding slurry, and trowel a feather-edge, polymer-modified leveling screed into the low spot to guide water smoothly toward existing scuppers.
- Install tapered insulation saddles: For larger low spots between drains, install rigid tapered polyisocyanurate insulation boards adhered with low-rise foam, topped with a cover board and a seamless waterproof membrane to divert flow.
- Clear drainage pathways: Ensure drain bowls sit recessed below the finished slab level and are fitted with clean strainer domes to prevent recurring backups.
Choosing the Right Concrete Roof Leakage Solution for Flat Slabs
Choosing the proper waterproofing material depends on your roof’s age, whether foot traffic is expected, and the local climate. Below is a direct comparison of the primary waterproofing technologies:
| Waterproofing System | Expected Working Life | Key Strengths | Limitations | Best Application |
|---|---|---|---|---|
| Acrylic Elastomeric Coatings | 5 – 10 Years | High solar reflectance, budget-friendly, simple DIY roll-on application | Low resistance to standing ponding water; lower puncture resistance | Sloped concrete roofs with good drainage and high sun exposure |
| Liquid Polyurethane (PU) Membranes | 15 – 25 Years | Seamless, handles continuous ponding water, high elasticity (>400%) | Higher material cost; sensitive to substrate moisture during install | Flat commercial and residential slabs with equipment or foot traffic |
| Integral Crystalline Waterproofing | Lifetime of Concrete | Penetrates concrete pores, self-heals future micro-cracks, resists extreme hydrostatic pressure | Cannot bridge large structural cracks on its own; requires bare, unsealed concrete | Deep slab remediation, new concrete pours, structural joint sealing |
Liquid-Applied Elastomeric and Polyurethane Membranes
Liquid-applied waterproofing membranes provide an uninterrupted, fully bonded rubber-like barrier over the entire concrete slab. Modern 2-component polyurethane systems form a tough, flexible shield that bridges structural micro-movements caused by severe temperature swings.
High-performance options like AQUASMART® – PU -2K. carry CE certification for an expected working life of 25 years with a minimal film thickness of just 1.5 mm. These advanced systems resist standing water, mechanical abrasion, and UV degradation without blistering.
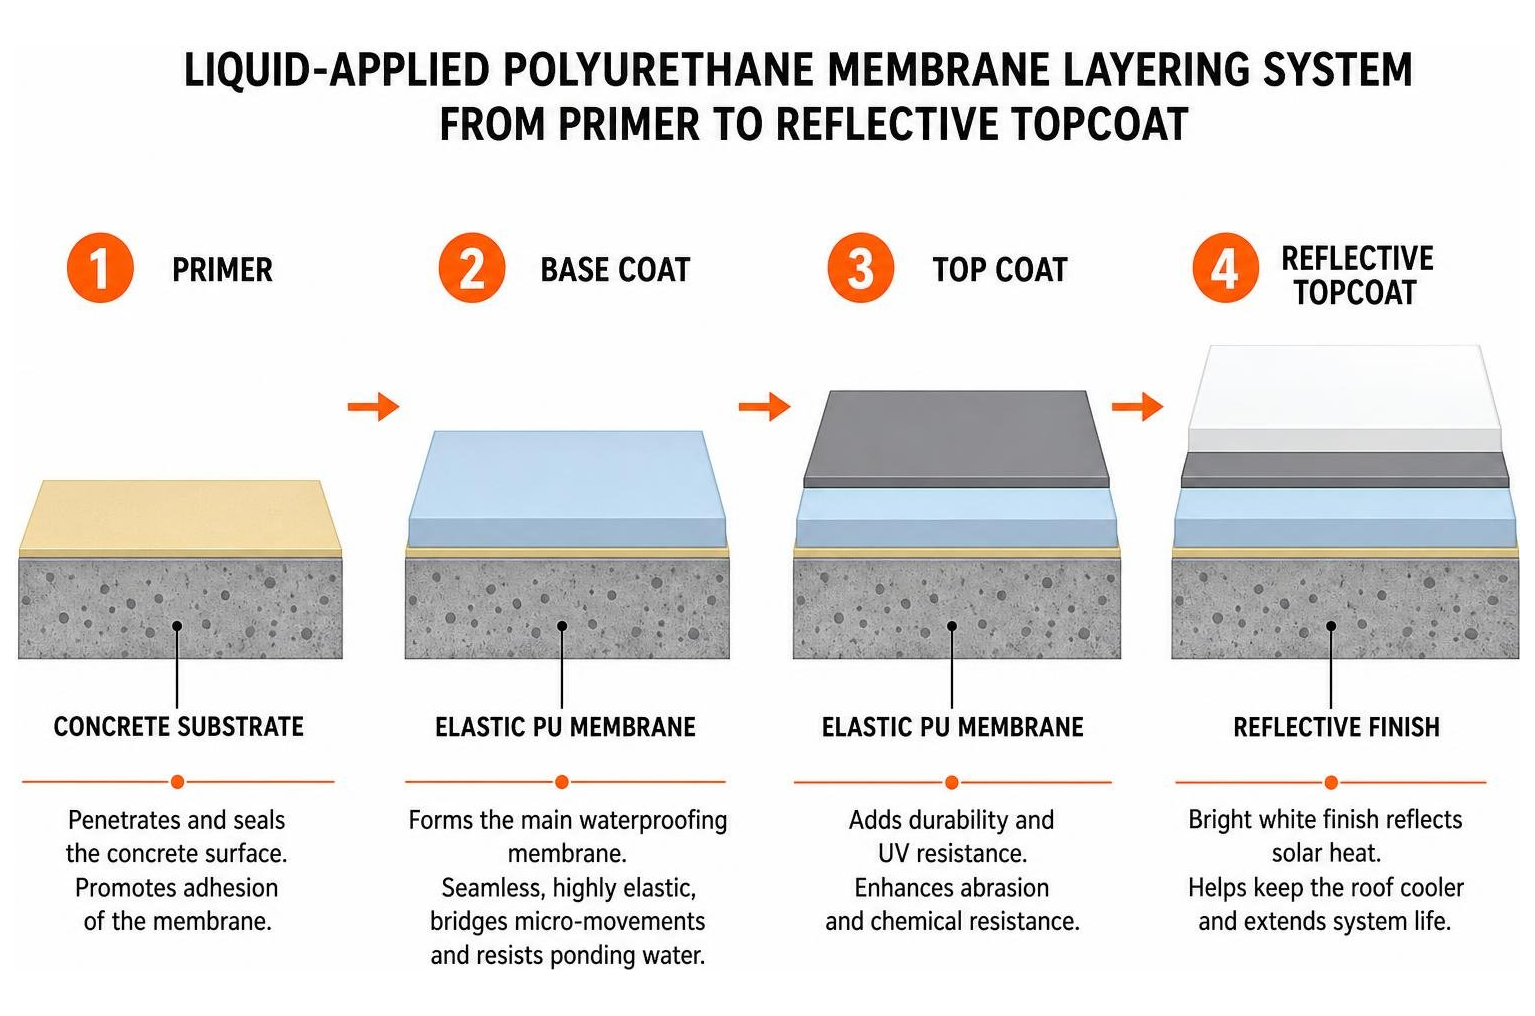
Furthermore, applying a bright white reflective liquid coating converts your roof into a high-performance “cool roof.” In urban and suburban settings where the urban heat island effect can drive city temperatures up by 4°C compared to surrounding rural areas, reflective coatings make a massive difference:
- Reflective coatings lower roof surface temperatures by 1.4°C to 4.7°C.
- High solar reflectance (the AQUASMART® system achieves a Total Solar Energy Reflectance of 86.4%) reduces building cooling energy demands by 15% to 35.7% depending on the climate.
- By keeping the slab cooler, thermal expansion and contraction are minimized, preventing future stress cracks from developing in the concrete.
Integral Crystalline Waterproofing for Deep Slab Sealing
Unlike topical coatings that sit on top of the concrete slab, crystalline waterproofing treatments work from within the concrete matrix itself. These formulations contain proprietary chemicals that react with unhydrated cement particles and moisture to grow millions of microscopic, insoluble needle-like crystals inside the slab’s capillary pores.
Because these crystals block the passage of liquid water while allowing moisture vapor to breathe out, they permanently seal the slab against hydrostatic pressure. Best of all, if water enters a new micro-crack years later, the dormant chemicals reactivate to grow fresh crystals and self-heal cracks up to 0.5 mm wide automatically.
DIY Fixes vs. Professional Repair: When to Call an Expert
Tackling a leaking roof yourself can be satisfying and cost-effective for minor maintenance, but concrete flat roofs carry unique structural and safety risks.
Temporary Patching vs. Long-Term Concrete Roof Leakage Solution
When an active leak threatens living spaces, reaching for a can of black asphalt roof cement or a wet-patch mastic from the local hardware store is a common knee-jerk reaction. While roof cement works fine as an emergency tarp-down fix during a midnight thunderstorm, it is essentially the “duct tape” of roofing:
- Asphalt incompatibility: Standard asphalt roof mastic dries out, oxidizes, and shrinks under direct sun exposure, turning brittle and cracking within a single season.
- Trapped moisture: Slapping thick, non-breathable asphalt over damp concrete traps water beneath the patch. When the sun warms the roof, that trapped moisture turns into steam, expanding and blistering the patch right off the deck.
- Freeze-thaw breakdown: In cold winter climates, water trapped in unsealed cracks expands by roughly 9% upon freezing, widening hairline fractures into gaping structural splits.
Temporary surface patches rarely survive a full annual weather cycle. Considering that the average flat roof replacement rate sits at 5% to 7% per year due to moisture neglect, investing in a professional-grade, multi-coat elastomeric or polyurethane system provides 8 to 12 years of reliable protection before requiring a simple recoat.
Preventing Future Leaks with Ongoing Slab Maintenance
To maximize your roof’s service life and avoid premature restoration, establish a regular maintenance routine:
- Semi-annual inspections: Inspect your concrete roof twice a year—once in early spring and once in late autumn—as well as after major severe storms.
- Keep scuppers and drains clear: Remove leaves, sediment, and organic debris from all drainage grates monthly. A clean drain prevents destructive ponding water.
- Check expansion joints: Inspect the flexible caulking in expansion joints and along parapet walls every two years, replacing any sections showing signs of debonding or tears.
- Recoat protective topcoats on schedule: High-performance waterproof coatings generally require a fresh protective topcoat every 5 to 10 years to maintain their full thickness, elasticity, and solar reflectance.
Frequently Asked Questions About Concrete Roof Leaks
How long does a concrete roof waterproofing repair typically last?
A high-quality, professionally applied liquid membrane system lasts between 8 and 12 years before requiring a maintenance recoat, while premium 2-component polyurethane systems can achieve working lifespans of up to 25 years. Routine DIY sealant patches on individual cracks generally last 1 to 3 years depending on thermal expansion and climate conditions.
Can standing or ponding water ruin a repaired concrete roof?
Yes. Standing water creates continuous hydrostatic pressure that seeks out the smallest pinhole in an imperfect patch. Furthermore, ponding water acts like a magnifying glass under the sun, concentrating UV rays and accelerating the thermal degradation of standard acrylic coatings. Only specialized polyurethane membranes or properly sloped screeds handle long-term ponding successfully.
What is the most durable sealant for structural cracks in concrete?
For active, moving structural cracks, low-pressure polyurethane foam or flexible epoxy resin injection is the most durable method. Polyurethane injection penetrates through the entire depth of the slab and expands to create a flexible, watertight gasket that accommodates future structural shifting without tearing.
Conclusion
A leaking concrete roof does not have to turn into an endless headache or an expensive tear-off project. By understanding how concrete absorbs water, catching early symptoms like efflorescence and minor cracks, and using the right flexible sealants and breathable liquid membranes, you can keep your building safe, dry, and energy-efficient for decades to come.
Whether you need a minor crack sealed or a full commercial liquid membrane restoration across our service areas—including Beecher City, Effingham, Shelbyville, Altamont, Vandalia, Ramsey, Salem, Hillsboro, and Litchfield, IL—our team at Mid-State Construction & Roofing, Inc. is ready to help. We combine top-tier materials with meticulous quality assurance and supervision to eliminate the installation errors that cause premature roof failures.
Take a proactive approach to protecting your building’s structural integrity. Contact Mid-State Construction & Roofing, Inc. today to schedule your comprehensive on-site roof assessment and get an engineered, long-term concrete roof leakage solution you can count on.