
Fix Broken Roof Tiles Without Paying a Fortune
Fixing Roof Tiles Before Small Damage Becomes a Leak
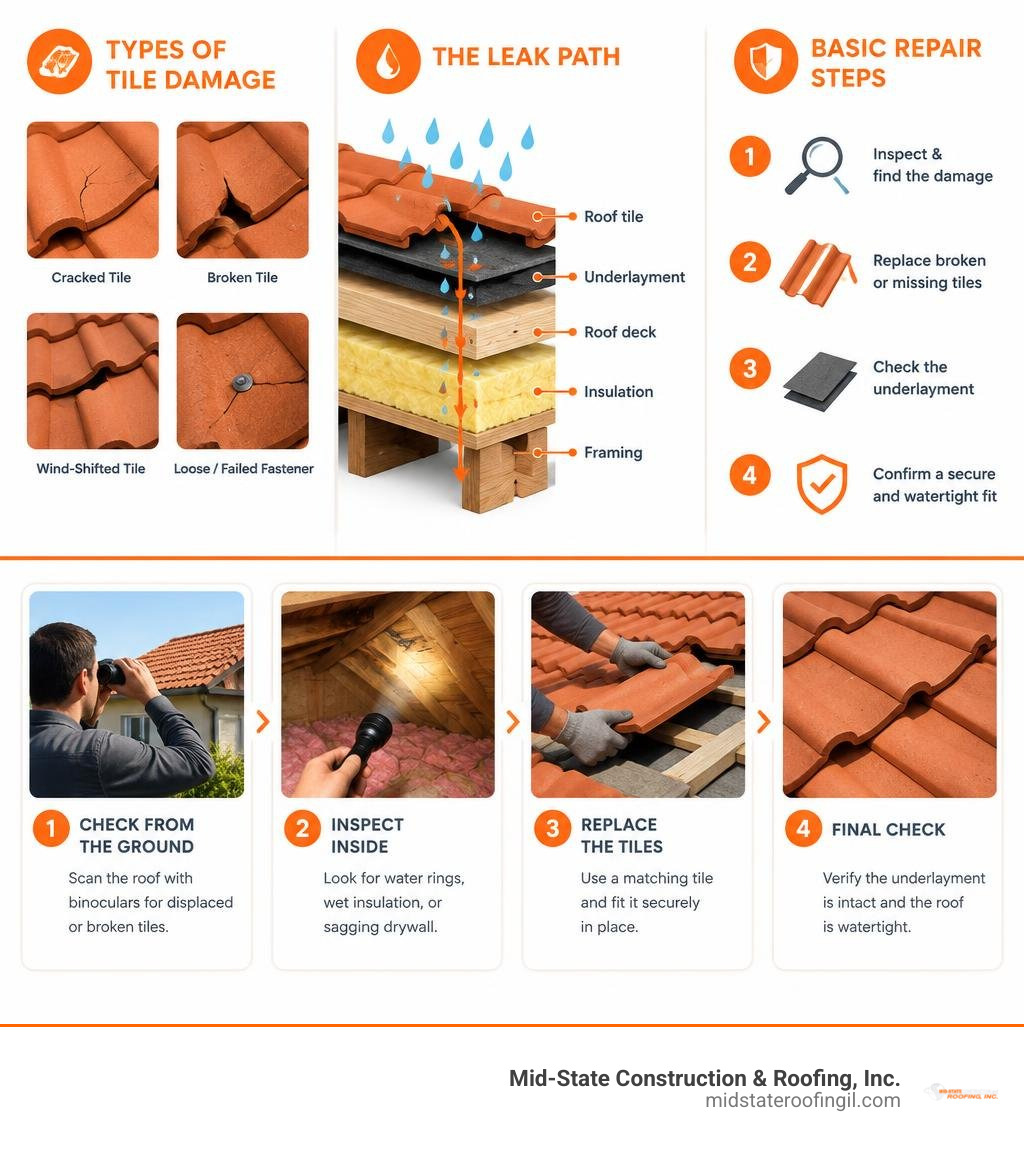
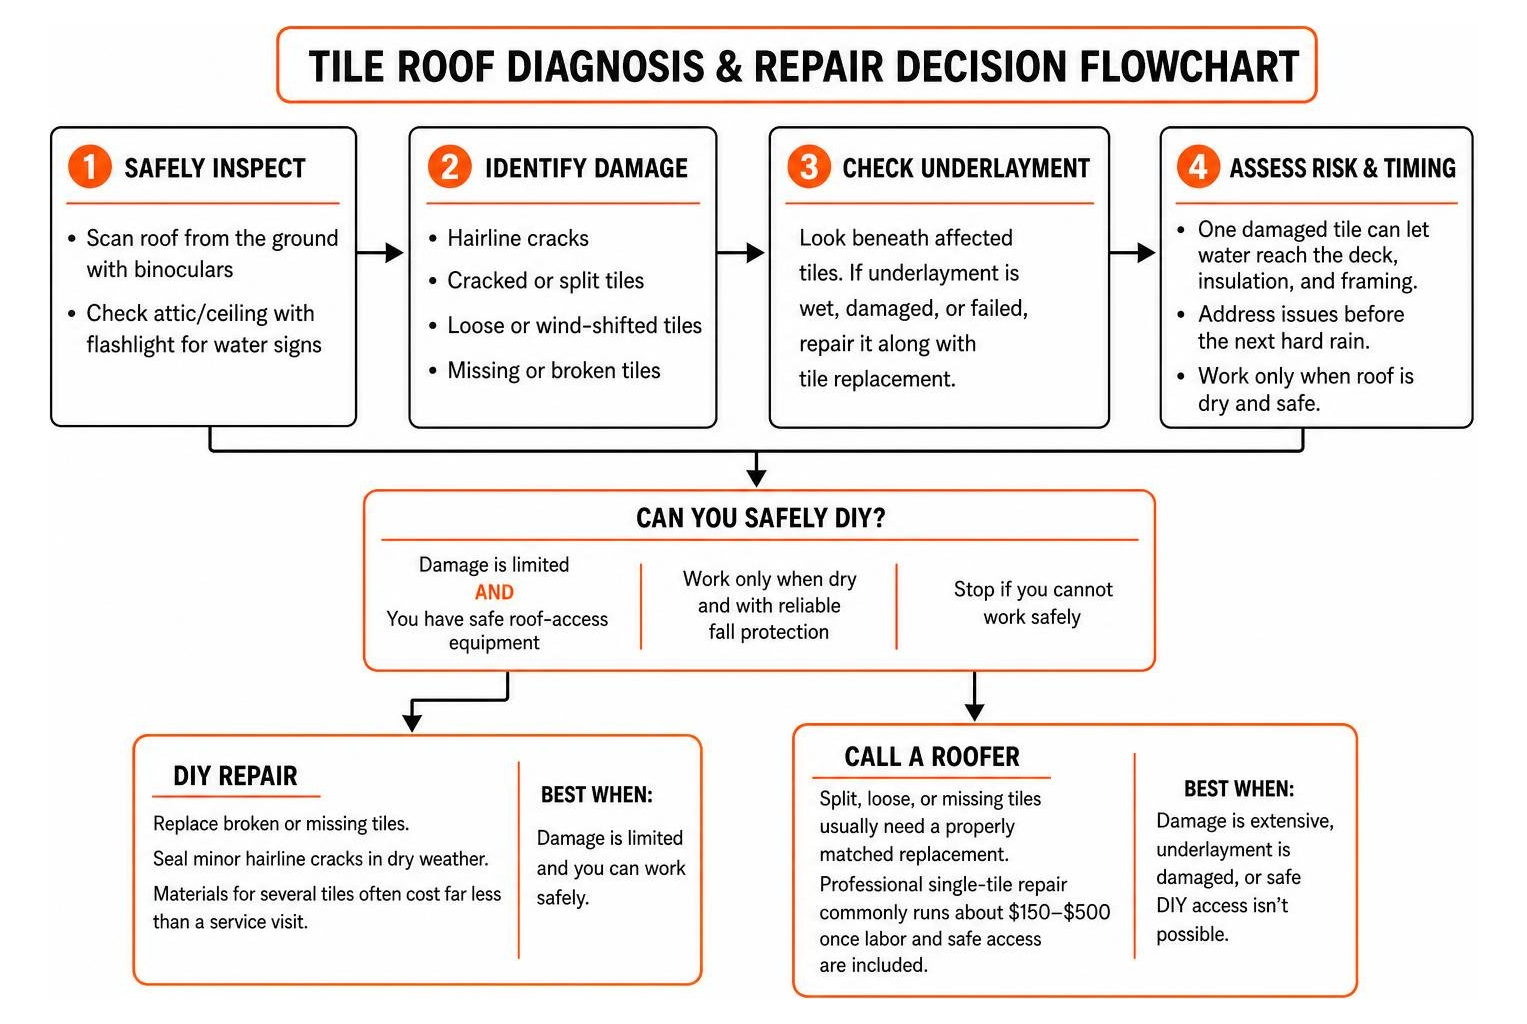
Fixing roof tiles starts with identifying the problem, replacing broken or missing tiles, and checking the underlayment beneath them. A hairline crack may be sealed temporarily in dry weather, but a split, loose, or missing tile usually needs a properly matched replacement. Work only when the roof is dry and safe to access, and stop if you cannot use reliable fall protection.
One damaged tile can let water reach the underlayment, roof deck, insulation, and framing. Tile roofs can last 50 to 100 years with good care, but their long life depends on addressing cracks, wind-shifted tiles, and failed fasteners before the next hard rain.
A DIY repair can be affordable when the damage is limited and you already have safe roof-access equipment. Materials for replacing several tiles often cost far less than a service visit, while a professional single-tile repair commonly runs about $150 to $500 once labor and safe access are included.
I am Virgil Strauch, a business leader with hands-on experience in planning practical maintenance decisions and managing repair priorities. In this guide, I will break down fixing roof tiles into clear steps, including when a cost-saving DIY repair makes sense and when calling a roofer is the safer choice.
Diagnosing Tile Damage and Understanding Roof Systems
Before climbing a ladder, start by evaluating your roof safely from the ground. Using a high-powered pair of binoculars allows you to scan slopes, hips, ridges, and valleys for displaced or shattered pieces without putting your weight on delicate surfaces. Proactive homeowners protect their property by spotting roof damage before it turns into a costly repair.
Inside the home, inspect the attic or ceiling cavity with a bright flashlight. Dark water rings on roof rafters, wet fiberglass insulation, or sagging drywall are clear warnings that moisture is bypassing both the surface tiles and the protective underlayment beneath them.
Cracked, Slipped, and Missing Tile Indicators
Roof tile damage usually falls into four primary categories:
- Hairline Stress Cracks: Small, superficial fractures caused by natural thermal expansion, mild hail impacts, or minor debris.
- Severe Splits and Breaks: Deep fractures through the tile body, commonly caused by falling tree limbs, heavy storm debris, or improper foot traffic.
- Slipped or Displaced Tiles: Intact tiles that have slid out of alignment due to wind uplift, corroded nails, or broken hanging nibs.
- Surface Delamination: Flaking, spalling, or erosion of the protective outer layer caused by moisture intrusion and seasonal freeze-thaw cycles.
| Damage Type | Visual Signs | Root Cause | Recommended Action |
|---|---|---|---|
| Hairline Crack | Fine surface line, no displacement | Thermal cycling, minor impact | Temporary flexible sealant or tile replacement |
| Complete Break | Tile split into two or more pieces | Heavy impact, severe storms, foot pressure | Full tile replacement |
| Slipped Tile | Crooked line, gap showing underlayment | Corroded fasteners, wind uplift, broken nib | Re-align, inspect nibs, and refasten |
| Missing Tile | Completely open gap on the roof plane | Severe windstorms, failed batten support | Install new matching replacement tile |
| Delamination | Flaking surface, crumbling edges | Freeze-thaw cycles, aging material | Remove and replace affected tiles |
Assessing Underlayment and Hidden Drainage Channels
A tile roof functions as a dual-layer shedding system. The outer clay or concrete tiles deflect the bulk of sunlight, wind, and heavy precipitation. Beneath those tiles lies a continuous moisture barrier known as underlayment, which catches any incidental moisture that migrates through tile laps. Understanding the importance of roof underlayment integrity helps explain why cracked tiles are such a serious concern.
When a tile cracks or slips, water easily finds the interlocking side laps and hidden drainage channels. If organic debris or dried silt clogs these channels, water diverts sideways beneath adjacent tiles, rotting the wooden battens and degrading the underlayment underneath.
Step-by-Step Process for Fixing Roof Tiles
Restoring a damaged roof section requires care and methodical execution. Understanding mechanical fasteners, batten spacing, and interlocking channels is essential before beginning work; reviewing proven techniques for replacing cracked and slipped roof tiles can provide helpful context.
Essential Tools and Safety Precautions for Fixing Roof Tiles
Working on a tile roof presents severe fall hazards and risk of material breakage. Homeowners must prioritize safety by strictly adhering to roofing safety best practices.
Required Tools and Gear:
- OSHA-compliant full-body harness and secure anchor rope
- Sturdy extension ladder with a top stabilizer bar
- Non-slip, soft-soled work shoes
- Heavy-duty flat pry bar or specialized tile-lifting hook
- Wooden shims or small timber blocks (2×4 scraps)
- Roofing hammer and corrosion-resistant fasteners (hot-dipped galvanized or copper)
- Trowel and elastomeric roof cement
- High-density foam pads or crawl boards for weight distribution
Always step solely on the lower third of each tile directly over the reinforced batten line. Never step on the middle span, unsupported tile corners, or delicate valley cutouts.
Removing Broken Tiles and Repairing Underlayment Tears
Follow these systematic steps to remove damaged field pieces without harming adjacent tiles:
- Support Surrounding Tiles: Gently wedge a flat pry bar under the two overlapping tiles immediately above the damaged piece. Insert wooden shims beneath them to relieve downward pressure.
- Dislodge Fasteners and Nibs: If the broken tile is nailed, carefully slide your pry bar underneath to lever the nail free. If hanging solely by top lugs (nibs) on the wooden batten, gently lift the lower edge and tilt the tile upward to clear the batten.
- Extract Broken Fragments: Pull the pieces downward along the roof pitch. Sweep away any accumulated grit, moss, or broken shards from the exposed batten space.
- Inspect and Patch Underlayment: Check the exposed underlayment for tears or punctures. Clean the surface, spread a thin layer of asphalt roof cement, and apply a patch of modified bitumen roofing membrane, sliding its upper edge under the upper underlayment course.
- Install the New Tile: Slide the matching replacement tile into place, engaging its top hanging nibs securely over the batten. Fasten with a non-corrosive nail if required, but avoid over-driving the fastener, which can crack brittle materials.
- Lower Overlapping Courses: Carefully pull out the wooden shims and let the upper tiles settle flat over the new replacement.
Sourcing Materials and Fixing Roof Tiles That Are Discontinued
Finding a replacement profile can prove challenging if your roof was installed decades ago. Sourcing begins by checking your own attic, garage, or shed, where original installers frequently leave leftover spares.
If you have no spares, visit regional architectural salvage yards or specialized tile suppliers with a broken fragment. When selecting materials, comparing residential roof tile materials and costs can help you decide between concrete options (roughly $2 to $10 per tile) and high-end clay profiles ($10 to $50+ per tile). Ensure the interlocking side channels and thickness match your existing layout exactly.
Emergency Repairs, Temporary Fixes, and Common Pitfalls
When stormy weather prevents an immediate full replacement, temporary weatherproofing protects your interior living space from escalating water damage.
Temporary Leak Prevention and Weather Considerations
If active rain threatens your roof deck, you must implement critical emergency roof repair procedures:
- Wet-Surface Adhesives: Apply specialized polyurethane or moisture-curing sealants directly over hairline surface cracks. These adhere to damp substrates and serve as a short-term barrier.
- Polyethylene Tarping: For multiple shattered tiles, stretch a heavy-duty UV-rated tarp over the damaged slope. Secure the upper edge past the roof ridge and weight the perimeter down with 2×4 lumber or smooth sandbags. Never nail through good field tiles.
- Ambient Temperature Realities: Roof surface temperatures regularly exceed 160°F during hot midwestern summers, making clay and concrete tiles brittle and vulnerable to stepping pressure. Conversely, freezing winter temperatures make tile adhesives stiff and unworkable. Perform non-emergency maintenance during dry, mild mornings (60°F–80°F).
Common DIY Mistakes to Avoid
Avoid these frequent mistakes when completing tile repairs:
- Excessive Sealant Application: Smearing adhesive over the surface without clearing internal watercourses traps water underneath, pushing leaks into batten spaces.
- Walking in Valley Channels: Stepping on angled cuts near valleys easily snaps unsupported tile edges.
- Neglecting Rake and Eave Fasteners: Perimeter facing tiles endure the highest wind uplift. Reattaching them with standard glue rather than mechanical fasteners risks blow-offs during high winds.
Repair vs. Replacement: When to Call a Professional
DIY repairs make financial sense for replacing a handful of accessible field tiles. Materials for 5 to 10 tiles typically run between $50 and $200. However, hiring a professional roofer ($50 to $100 per hour) becomes the smarter choice when:
- Multiple tiles are shattered across complex roof hips and valleys.
- The roof pitch is steep (greater than 6:12), requiring specialized scaffolding or roof jacks.
- Large sections of underlying felt underlayment have rotted, requiring widespread batten removal ($600 to $1,500+).
- Flashing around chimneys, skylights, or wall abutments has failed ($1,500 to $3,000+).
Homeowners facing aging surfaces should weigh their options by evaluating roof repair vs full replacement. If widespread structural movement or storm hail has damaged large slopes, an insurance claim inspection may be necessary.
Frequently Asked Questions About Roof Tile Maintenance
Can I repair a cracked roof tile with sealant instead of replacing it?
Sealants and adhesives should only serve as a temporary stopgap. While elastomeric and polyurethane sealants can close a hairline crack in an emergency, they degrade under continuous UV exposure and seasonal expansion. Furthermore, surface adhesives often block underlying drainage channels. Replacing the damaged tile with an intact piece is the only reliable permanent solution.
How do hot and cold weather conditions impact tile repairs?
Extreme heat makes concrete and clay tiles significantly more brittle, while intense summer sun can elevate roof deck temperatures beyond 160°F, creating severe safety risks. In contrast, sub-freezing winter weather prevents roofing cement and adhesives from curing properly. It is best to schedule tile repairs during dry, mild weather between 60°F and 80°F.
How do I safely walk on a tile roof without causing more cracks?
Distribute your body weight evenly by stepping only on the lower third of each tile, where it overlaps the underlying tile and rests directly on the structural roof batten. Never step on the unsupported center or interlocking side edges of a tile. Use soft-soled shoes and place foam pads or crawl boards across the slope to spread your weight over multiple contact points.
Conclusion
Proactive roof maintenance preserves structural framing, protects home value, and prevents small surface cracks from turning into costly interior water damage. While minor repairs can often be handled with basic tools and steady hands, working on elevated, fragile tile slopes always carries inherent risks.
When your roof demands specialized flashing adjustments, steep-pitch access, or full structural underlayment restoration, rely on trained roofing specialists. For homeowners across Beecher City, Effingham, Shelbyville, Altamont, Vandalia, Ramsey, Salem, Hillsboro, and Litchfield, Mid-State Construction & Roofing, Inc. delivers expert residential roofing and storm restoration services backed by comprehensive quality assurance.