Seal Low Slope Roofs Quickly to Prevent Structural Rot
Stop Low-Slope Roof Leaks Before They Cause Rot

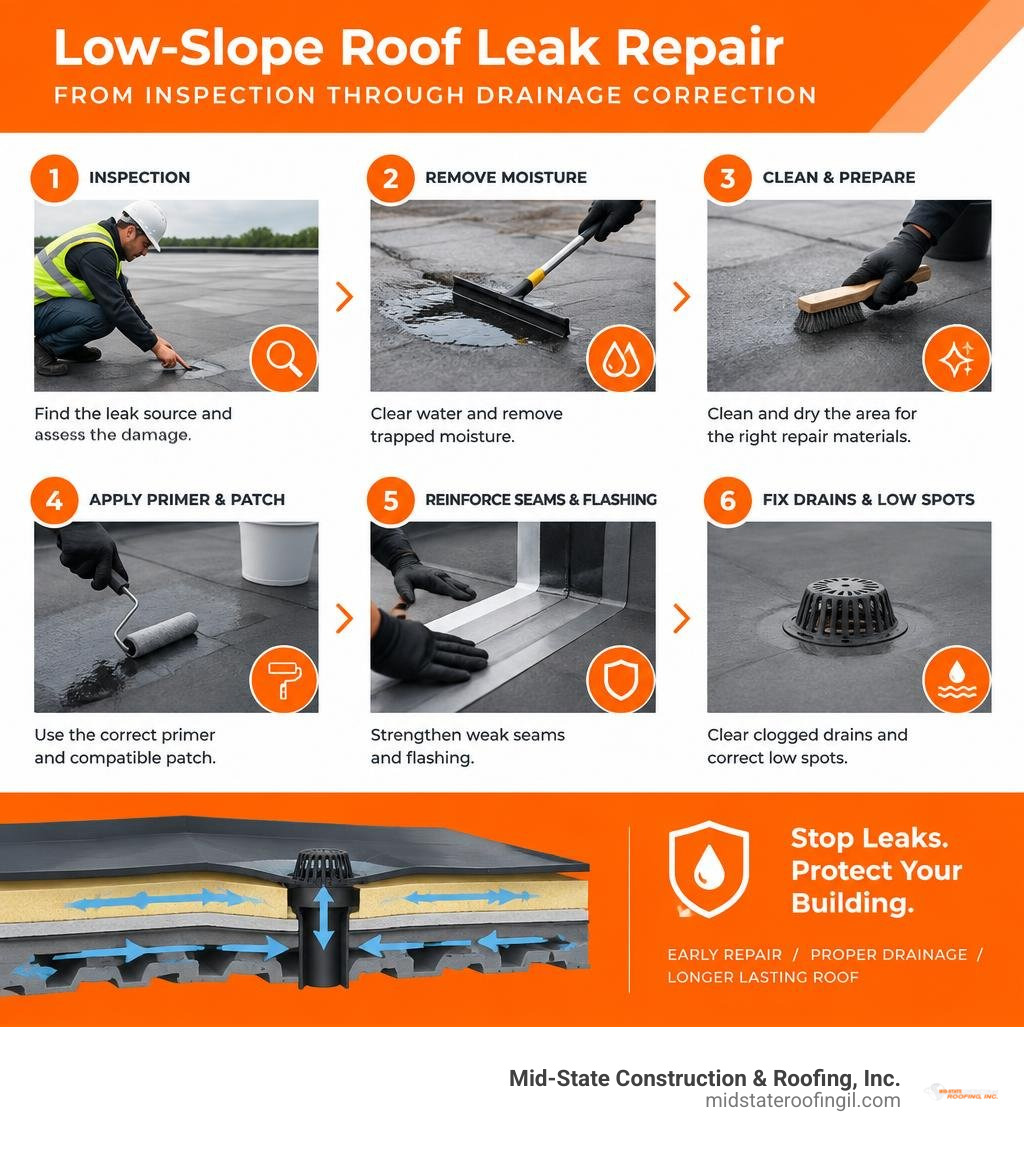
For effective low slope roofing repair, find the leak source, remove trapped moisture, and repair the membrane with materials made for that roof type. Clean and dry the damaged area first, use the correct primer or compatible patch, reinforce weak seams and flashing, and fix clogged drains or low spots that leave water standing.
On a low-slope roof, water can travel sideways beneath the membrane. That means the ceiling drip may not sit directly below the actual opening. If water reaches insulation or the roof deck, it can reduce insulation performance, corrode fasteners, and lead to hidden wood rot or deck damage.
Quick action matters. A properly cleaned, primed, and installed patch can often last 5 to 10 years, but a patch alone will not solve a drainage problem or widespread wet insulation.
I’m Virgil Strauch, a business leader with practical experience in planning, operations, and long-term asset decisions, including the priorities that shape dependable low slope roofing repair. This guide explains how to spot the real problem, choose a sound repair path, and prevent a small leak from becoming structural damage.
Identifying Hidden Moisture and Structural Threats on Low-Pitch Assemblies
Unlike steep-pitch roofs that rely on gravity to rapidly shed precipitation, low-slope roofs operate under hydrostatic principles. When water lingers, even microscopic punctures allow moisture to penetrate the assembly through capillary action. Recognizing the 5 signs your flat roof needs repair early saves thousands of dollars in structural decking replacement.
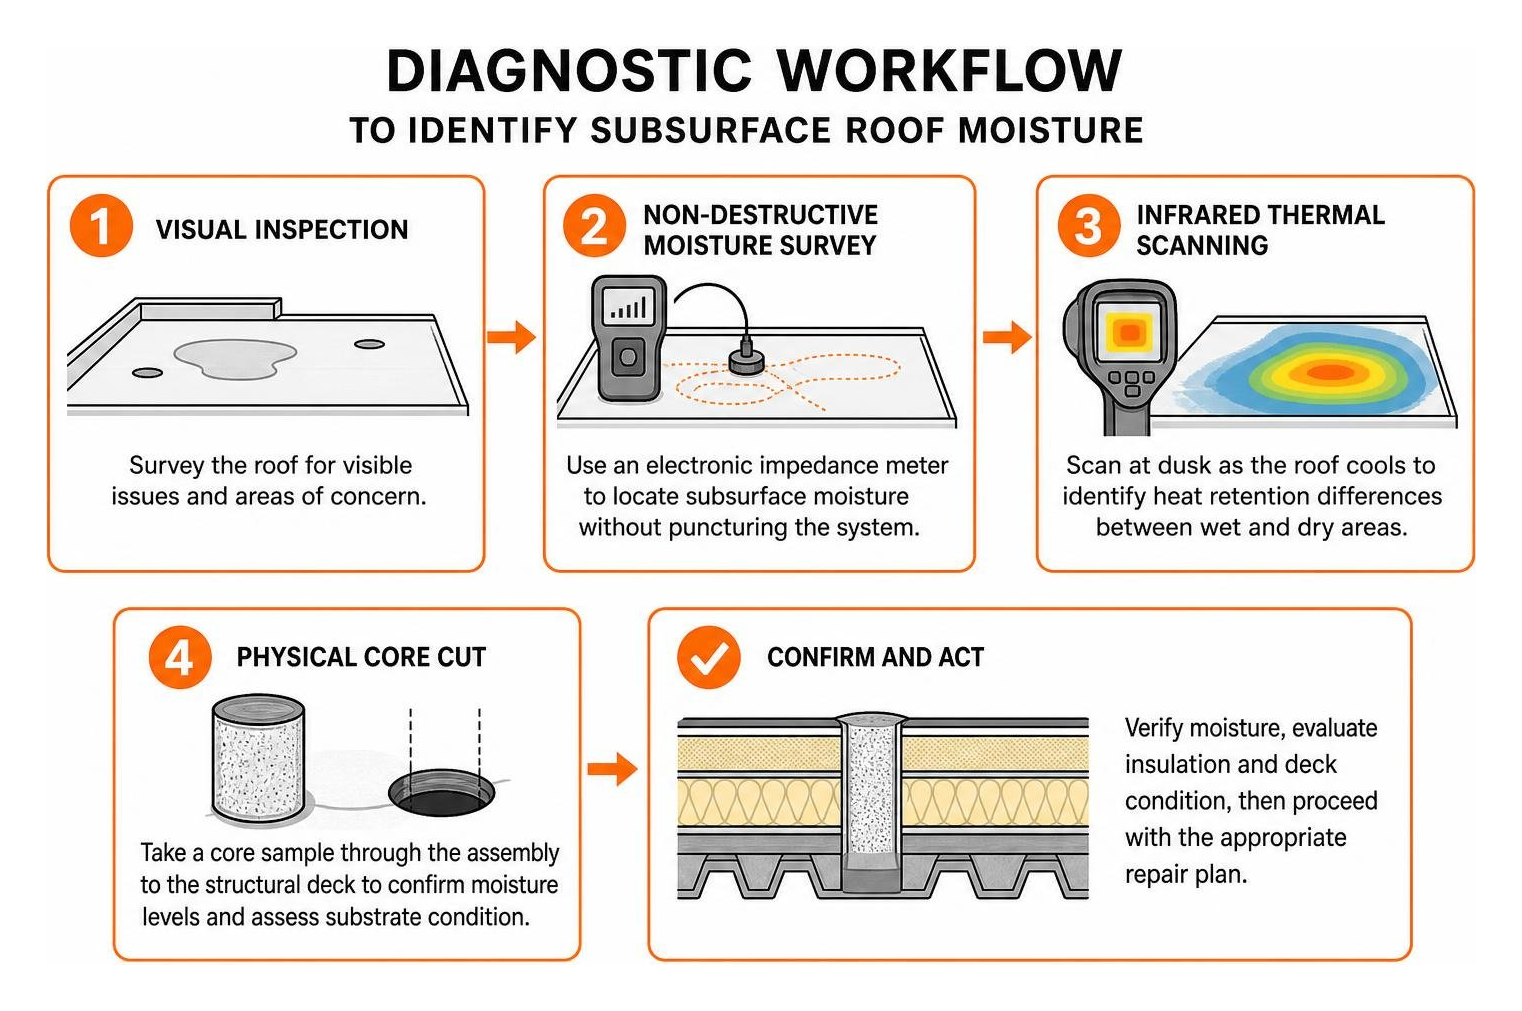
Water on a low-slope assembly rarely moves straight down. Once it breaches the top layer, it travels horizontally along insulation joints, vapor barriers, and fluted steel decking. Finding the exact point of entry requires specialized diagnostic methods:
- Non-Destructive Moisture Surveys: Electronic impedance meters measure electrical conductance across the membrane to locate sub-surface moisture pockets without puncturing the system.
- Infrared Thermal Scanning: Performed at dusk as the roof cools, thermal imaging captures heat retention differences between dry insulation and wet insulation.
- Physical Core Cuts: A cylindrical sample cut through the assembly down to the structural deck confirms moisture levels, substrate degradation, and insulation integrity.
When moisture saturates the polyisocyanurate (polyiso) insulation board, thermal resistance drops dramatically, inflating your facility’s energy bills. Worse, lingering moisture triggers severe chemical reactions: wood decks rot, structural concrete spalls, and steel fasteners corrode until they back out completely. Knowing how to spot roof damage before it turns into a costly repair protects the entire building envelope.
| Membrane Type | Common Leak Symptoms | Hidden Threat Level | Recommended Action |
|---|---|---|---|
| EPDM Rubber | Bridging seams, shrinkage tears, dried uncured flashings | High (Capillary lateral flow) | Clean, prime, apply cured cover tape |
| TPO / PVC | Cracked welds, crazing from UV, puncture tears | Moderate to High | Solvents wash, robotic or hand hot-air weld |
| Modified Bitumen | Alligatoring, open lap seams, blistered cap sheet | High (Deck rot under insulation) | 3-course mastic/mesh or torch/cold adhesive patch |
| Built-Up (BUR) | Ridging, gravel displacement, inter-ply splits | Severe (Multi-layer saturation) | Remove gravel, prime, bitumen patch reinforcement |
Inspecting Critical Low-Slope Failure Points
Over 90% of low-slope roof leaks originate at flashings, penetrations, and transitions rather than the open membrane field. Routine visual checks must focus on these high-stress areas:
- Parapet Walls & Coping Caps: Wind uplift strains coping joints. Cracked mortar or failed coping splices allow driving rain to bypass the roof edge.
- Scuppers and Interior Drains: Clotted drain bowls cause localized hydrostatic head pressure, forcing water backward into adjacent lap seams.
- Penetration Flashings & Pipe Boots: Mechanical vibrations from rooftop HVAC units crack brittle sealants in pitch pockets and stress boots.
- HVAC Curbs and Equipment Rails: Inadequate curb height (less than 8 inches above the finished roof surface) permits snowdrifts and heavy rain splash to pour behind counterflashing.
Establishing a scheduled routine underscores the importance of routine roof inspections to address vulnerable details before water penetrates structural wood joists or steel decking.
Step-by-Step Low Slope Roofing Repair Protocols
Executing a durable repair on a low-pitch roof requires strict adherence to material compatibility and proper surface prep. Slapping unapproved asphalt roof cement over an EPDM or TPO membrane degrades the polymer chains and accelerates failure.
Industry standards outlined in the Repair Manual for Low-slope Membrane Roof Systems stress that patches must restore the assembly’s original tensile strength and weatherproofing integrity. Edge securement and perimeter flashings must comply with ANSI/SPRI ES-1 standards to withstand high wind uplift forces common across Central Illinois commercial properties.
Surface Preparation and Primer Selection
Substrate cleanliness dictates whether a patch lasts a decade or fails after the first hard freeze. Atmospheric fallout, grease, oxidation, and blooming agents prevent adhesives from bonding.
- Deep Surface Cleaning: Scrub the repair area extending at least 6 to 12 inches beyond the damage zone using a non-filming cleaner or membrane-specific solvent (such as acetone or weathered membrane cleaner) until the surface is free of dirt, chalk, and biological film.
- Substrate Priming: Apply a polymer-compatible primer evenly over the cleaned target area. The primer chemically alters the membrane surface energy, ensuring deep adhesion. Never apply tape or liquid membranes over unprimed single-ply rubber.
- Seam Rolling: When applying peel-and-stick membranes or cured cover strips, use a heavy steel silicone seam roller. Roll firmly outward from the center in multiple crisscrossing passes to purge trapped air bubbles and activate pressure-sensitive adhesives.
- Three-Course Liquid Detailing: For irregular curb joints and penetrations, apply a base layer of liquid flashing, embed non-woven spunbound polyester reinforcement fabric without wrinkles, and immediately encapsulate it with a generous topcoat to form a seamless hydrostatic seal.
If unexpected water intrusion threatens equipment, executing structured emergency roof repair procedures limits secondary drywall and ceiling rot while planning permanent restoration.
Substrate-Specific Low Slope Roofing Repair Techniques
Every roofing material exhibits unique thermal expansion traits and chemical formulations. Matching the repair methodology to your specific single-ply flat roof or asphaltic membrane ensures a lasting fix.
- EPDM (Ethylene Propylene Diene Monomer): Never use asphalt-based cements on EPDM, as petroleum solvents liquefy the synthetic rubber. Clean with specialized EPDM cleaner, apply quick-dry EPDM primer, install a pre-cured peel-and-stick EPDM patch with rounded corners (extending a minimum of 3 inches past the defect), and finish by sealing the exposed patch edges with lap sealant.
- TPO and PVC Membranes: Thermoplastic systems require hot-air welding rather than adhesives. Clean the weathered sheet thoroughly to remove oxidation. Cut a matching TPO/PVC patch, round the edges, and utilize an automated or handheld hot-air welder set between 800°F and 1000°F to fuse the thermoplastic sheets at the molecular level. Probe all welded seams with a blunt cotter-pin tool to confirm bond integrity.
- Modified Bitumen & Built-Up Roofing: Execute modified bitumen roof repair by clearing all loose mineral granules or gravel surfacing. Apply a cold-applied flashing mastic or SBS adhesive, embed high-tensile polyester reinforcing mesh, and apply an elastomeric topcoat. For torch-applied cap sheets, ensure certified applicators observe full fire-watch protocols to eliminate decking combustion hazards.
Eliminating Ponding Water and Resolving Drainage Inadequacies
The National Roofing Contractors Association (NRCA) defines ponding water as standing liquid that remains on a roof surface for 48 hours or longer following precipitation. Standing water exerts continuous hydrostatic pressure, magnifies solar UV degradation like a magnifying lens, collects debris, and invites biological algae growth that destroys roof seams.
When existing structural slope is insufficient, several engineering approaches resolve low areas:
- Tapered Polyiso Insulation Overlays: During recovers or localized cut-outs, installing tapered polyisocyanurate insulation creates a positive gradient (typically 1/4 inch of vertical rise per 12 inches of horizontal run) directing runoff toward drainage bowls.
- Roof Leveling Compounds: Specialized lightweight polymeric slope-building compounds (such as high-density EPS resins mixed with recycled rubber granules) can be troweled directly onto primed low spots to build pitch and divert water toward scuppers.
- Drain and Scupper Optimization: Enlarge undersized interior drain rings, clear underground leader lines, or core out low parapet sections to insert larger collector scupper boxes with drop-down conductors.
- Targeted Silicone Restoration: In shallow depressions where re-framing is cost-prohibitive, applying a specialized silicone coating roof repair creates an impermeable moisture-cure shield. Because standing water is an aggressive service environment, apply high-solids silicone at a minimum dry film thickness of 40 mils across confirmed ponding zones.
When to Choose Fluid Coatings vs. Low Slope Roofing Repair
Fluid-applied elastomeric roof coatings offer a cost-effective path to restore an aged membrane without a full tear-off. However, coating a failing roof without addressing underlying trapped moisture is a costly mistake.
Evaluating fluid systems requires comparing key chemistry profiles:
- High-Solids Silicone Coatings: Silicone is inorganic, hydrophobic, and cures via atmospheric moisture. It will not break down under prolonged ponding water and provides exceptional UV resistance. It is the premier choice for roofs with minor drainage delays.
- Elastomeric Acrylic Coatings: Acrylic systems are water-based, highly reflective cool-roof coatings that reduce interior cooling loads. However, acrylics re-emulsify under standing water and cannot be applied in freezing or damp conditions. They are strictly suited for positive-draining substrates.
If wet insulation accounts for less than 25% of the total surface, cutting out the wet sections, inserting sound polyiso, reinforcing the seams, and applying a fluid-applied membrane provides one of the most cost effective roof repair solutions available. For detailed standards, review the low-slope roof coating restoration guide.
Evaluating Repair vs. Full Membrane Replacement
Property owners often face a crossroads: should you continue patching, recover the system, or invest in a full tear-off?
Making the right choice depends on local building codes, structural moisture content, and age:
- The Two-Layer Building Code Limit: The International Building Code (IBC) prohibits installing a new roof system over a building that already has two or more roof applications. If your commercial property has an original BUR system covered by a retrofitted single-ply sheet, building codes require a complete tear-off before a new assembly can be installed.
- Substrate Saturation (>25% Rule): If thermal imaging and core analysis indicate that more than a quarter of the underlying insulation board is wet, localized repairs will fail. Trapped moisture continuously outgasses in summer heat, creating blisters that rupture new coatings and rot roof framing from the inside out.
- Structural Load Capacity: Heavy gravel-surfaced assemblies or ballasted systems add significant dead loads. If the structural framing cannot accommodate additional weight, a full tear-off down to the bare deck is the only safe engineering route.
When deciding between strategies, our comprehensive review of roof repair vs replacement best options helps facility owners calculate true life-cycle costs and return on investment.
Long-Term Preventative Maintenance Strategies
A well-installed low-slope commercial roof can protect a facility for 20 to 30 years, but longevity depends heavily on ongoing maintenance. Preventative care minimizes emergency downtime and extends asset life:
- Bi-Annual Inspections: Schedule thorough roof assessments every spring and autumn, as well as immediately following severe hail or high-wind storm events.
- Debris & Drain Clearing: Keep gutters, collector heads, and interior strainers clear of leaves, branches, and trash. Standing organic matter produces acidic compost that erodes roof sheets.
- Field Seam & Termination Checks: Inspect perimeter termination bars, expansion joints, and base flashings for seal degradation, mechanical fastener back-out, or wind tears.
- Keep Maintenance Logs: Maintain photographic logs of all repairs, warranty papers, and HVAC service records. Documenting proper maintenance protects manufacturer warranties against premature claims denial.
Implementing these 7 flat roof maintenance tips prevents minor seam gaps from becoming major structural rot.
Frequently Asked Questions About Low-Pitch Roof Leak Solutions
Can asphalt shingles be installed on a low-slope roof?
Standard asphalt shingles cannot be installed on a low-slope roof with a pitch under 2:12 (and require specialized double-underlayment between 2:12 and 4:12). Shingle systems rely entirely on gravity to shed water over overlapping layers. On low pitches, wind-driven rain and capillary draw force water underneath shingles, rotting the roof deck. Low slopes require continuous, welded or adhered membrane systems such as TPO, PVC, EPDM, or modified bitumen.
How long do patches last on low-slope commercial roofs?
A professionally executed patch on a low-slope roof can last 5 to 10 years, frequently outlasting the surrounding aged membrane. Achieving this lifespan requires proper surface cleaning with solvents, matching primers, mechanical seam rolling, and perimeter lap sealant. Unprepped “quick fixes” using incompatible wet-patch tar typically fail within a single freeze-thaw season.
What is the most effective sealant for standing ponding water?
High-solids, 100% silicone sealants and moisture-cured polyurethanes are the most effective solutions for ponding areas. Unlike water-based acrylics that re-emulsify and break down under prolonged water contact, silicone forms an inorganic, hydrophobic bond that remains fully waterproof and flexible under standing water and freeze-thaw cycles.
Conclusion
Water intrusion on a low-pitch roof is an urgent issue. Left unaddressed, trapped moisture silently degrades insulation R-value, corrodes mechanical fasteners, and causes extensive structural rot across wood joists and steel decks.
At Mid-State Construction & Roofing, Inc., we bring industry-leading training, rigid quality assurance, and hands-on project supervision to every project. Whether you manage a manufacturing plant, retail property, or residential low-pitch addition, our team identifies the root cause of water penetration and delivers permanent fixes. If your property needs dependable commercial or residential roofing services, schedule a prompt inspection with our team for reliable commercial and residential roofing in Altamont and across our Central Illinois service communities.