
Comprehensive Standards for IKO Shingle Installation Prep and Fastening
Manufacturer requirements for proper IKO shingle installation mandate a minimum roof slope of 2:12, a structurally sound deck of at least 3/8-inch plywood or 7/16-inch OSB, and corrosion-resistant 11- or 12-gauge roofing nails with 3/8-inch heads. Installers must drive 4 to 6 nails per shingle in the designated nailing zone, ensure at least 3/4-inch deck penetration, and follow a strict layering sequence: eave drip edge, ice and water protector, synthetic underlayment, rake drip edge, and metal valley flashing. Adhering to official resources such as the Blueprint for Roofing Shingle Application Guide ensures building code compliance and protects manufacturer warranty coverage. At Mid-State Construction & Roofing, Inc., we follow every specification to guarantee long-term roof durability.
Fastener selection is critical. Every nail driven into an IKO shingle must be an 11- or 12-gauge corrosion-resistant roofing nail with a head diameter of at least 3/8 inch and a minimum length of 1 inch. Fasteners must sit flush with the shingle surface without cutting into the asphalt mat. Under-driven nails can puncture overlapping shingles above, while over-driven nails reduce wind resistance and tear the fiberglass reinforcement.
| Parameter | Standard Application | High-Wind / Steep-Slope Application |
|---|---|---|
| Nails Per Shingle | 4 nails | 6 nails (up to 8 on extreme slopes) |
| Nail Gauge & Head | 11–12 gauge, 3/8″ head minimum | 11–12 gauge, 3/8″ head minimum |
| Deck Penetration | 3/4″ into deck (or 1/8″ through sheathing) | 3/4″ into deck (or 1/8″ through sheathing) |
| Wind Resistance Rating | Up to 110 mph (177 km/h) | Up to 130 mph (210 km/h) with upgrade |
| Slope Requirement | 4:12 pitch up to 21:12 | 21:12 or higher, or high-wind zones |
Roof Deck Safety, Inspection, and Slope Standards
Before unrolling underlayment, inspect the entire roof deck for rotted wood, delamination, and sagging rafters. Minimum deck thickness standards require at least 3/8-inch exterior-grade plywood or 7/16-inch non-veneer OSB sheathing. If you find loose or spongy boards, refasten or replace them to establish a smooth, flat nailing surface. Knowing what to expect during roof installation helps homeowners understand why thorough deck preparation is essential before laying new materials.
Roof pitch determines which installation methods and warranty terms apply:
- Prohibited Slopes (< 2:12): Never install asphalt shingles on slopes below a 2:12 pitch (less than 2 inches of rise per 12 inches of horizontal run). Water drains too slowly on these shallow angles, increasing the risk of standing water and interior leaks.
- Low-Slope Applications (2:12 to < 4:12): Slopes between 2:12 and 4:12 require specialized underlayment methods, such as a complete layer of self-adhering ice and water membrane or double-lapped synthetic felt. Shingles installed on slopes from 2:12 down to less than 3:12 carry a 12-year limited warranty, while pitches from 3:12 up to 4:12 receive standard full-term warranty protection when properly underlaid.
- Standard Slopes (4:12 and Greater): Slopes at or above 4:12 provide normal gravity drainage, allowing standard underlayment overlaps and typical nailing patterns.
Underlayment, Drip Edge, and Valley Flashing Execution
Water travels downward by gravity, so every layer must lap over the one below it. Installing edge components in the wrong order can trap water behind wood fascia instead of guiding it into gutters.
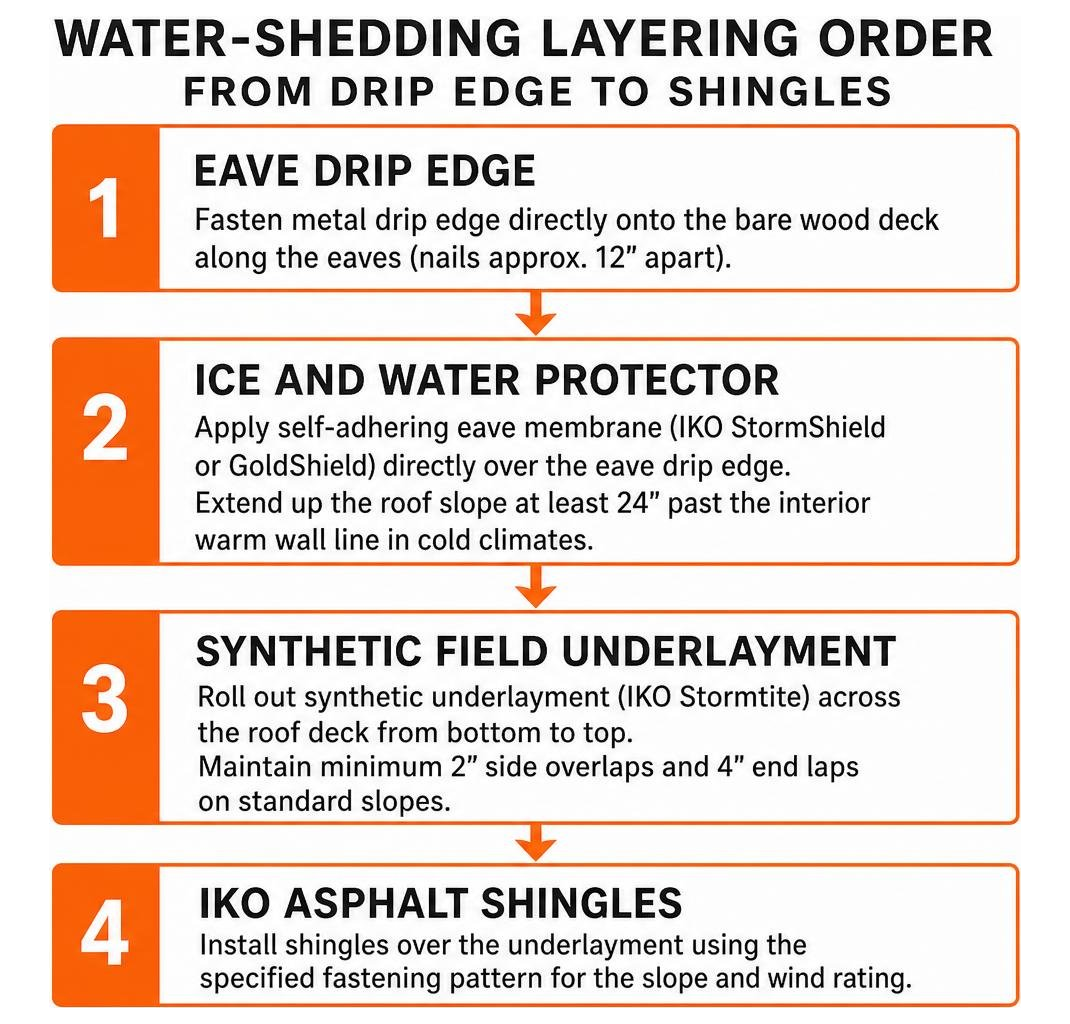
Follow this precise sequence to seal the roof perimeter and valleys:
- Eave Drip Edge: Fasten corrosion-resistant metal drip edge directly onto the bare wood deck along the eaves, spacing nails roughly 12 inches apart.
- Ice and Water Protector: Apply a self-adhering eave membrane (such as IKO StormShield or GoldShield) directly over the eave drip edge. In cold climates prone to freezing, the barrier should extend up the roof slope at least 24 inches past the interior warm wall line to defend against ice dams. Understanding how roofing underlayment protects home integrity underscores why these protective membranes are critical.
- Synthetic Field Underlayment: Roll out synthetic underlayment (such as IKO Stormtite) across the roof deck from bottom to top. Maintain minimum 2-inch side overlaps and 4-inch end laps on standard slopes.
- Rake Drip Edge: Fasten drip edge over top of the synthetic underlayment along the rake (gable) edges. This keeps wind-driven rain from getting underneath the underlayment margins. You can explore complete edge details in our guide to drip edge and step flashing installation.
- Open Metal Valleys: For valleys, IKO recommends open metal valley construction for reliable long-term water shedding. Center a minimum 36-inch-wide strip of ice and water membrane down the valley centerline, lay a preformed corrosion-resistant metal valley liner over it with at least 150 mm (6 inches) of end lap, and secure it with minimal edge nailing and asphalt roof cement.
Step-by-Step Instructions and Finishing Requirements

Accurate layout keeps shingle courses straight, weather-tight, and visually appealing across wide roof planes. IKO architectural shingles leverage True Square Advantage dimensions, providing 33 1/3 square feet of coverage per bundle (with exactly 3 bundles per square). Because trimming around hips, valleys, rakes, and dormers uses up material, factor in a 10 to 15 percent material waste allowance when calculating total bundle requirements. For additional material profiles and system accessories, consult IKO North America: Shingle Manufacturer & Roofing Products.
Starter Strip and First Course IKO Shingle Installation
A strong perimeter starts with dedicated starter shingles, such as IKO Leading Edge Plus, or IKO EdgeSeal double-sided starter tape. Choosing the right accessories is as critical as selecting quality asphalt shingles for your home’s exterior.
- Position starter shingles with their factory sealant strip facing upward and placed along the bottom eave edge.
- Overhang the starter strip past the metal drip edge by 1/4 inch to 3/4 inch along both eaves and rakes to direct water clear of the fascia.
- Fasten starter shingles roughly 3 inches above the bottom edge and 1 inch in from each end.
- When placing the first course of full shingles, offset all vertical joints by at least 6 inches from the starter strip joints beneath them to prevent water penetration at shingle seams.
Field Course Alignment, Exposure, and Nailing Patterns
IKO Cambridge architectural shingles are engineered for a standard 5-7/8 inch weather exposure. Snap horizontal chalk lines every few courses to keep rows level from eave to ridge across wide roof expanses.
Fastener placement directly affects wind resistance and warranty compliance:
- Nail Placement: Fasten nails along the designated nail line, below the sealant strip and above the cutouts, penetrating both layers of the laminated shingle. For IKO performance shingles featuring the ArmourZone backing, drive nails squarely inside the reinforced tape area.
- Standard Application (4 Nails): Drive four nails per shingle, spaced roughly 1 inch in from each side edge and evenly spaced across the center. Ensure nails are positioned at least 2 inches away from joints in the overlapping course above.
- High-Wind Application (6 Nails): In severe wind areas or on steep slopes (21:12 and greater), drive six nails per shingle to secure the 130 mph High Wind Warranty Upgrade.
- Deck Penetration: Nails must penetrate at least 3/4 inch into sound wood decking, or extend at least 1/8 inch completely through OSB or plywood that is thinner than 3/4 inch.
Manual Sealing and Hip and Ridge Shingle Application
Shingles rely on solar heat to activate their factory FastLock adhesive strips. If you install shingles during cold autumn or winter weather, or in areas with excessive airborne dust, manually seal the shingles to prevent wind uplift before warm weather arrives:
- Apply three spots of asphalt plastic roofing cement (roughly 1 inch in diameter) under the exposed lower edge of each shingle tab.
- Press each tab firmly into the cement. Avoid excessive use of roofing cement, as heavy globs can cause shingle blistering and degrade the asphalt mat.
Finish ridges and hips using color-matched capping shingles, such as IKO Ultra HP or pre-cut hip and ridge units:
- On hips, begin at the bottom eave and work upward toward the ridge peak.
- On horizontal ridges, install caps starting from the end facing away from prevailing winds, working across so wind blows over the laps rather than underneath them.
- Fasten each cap shingle with two longer roofing nails (one on each side) driven high enough to be covered by the next overlapping cap with a 5-5/8 inch exposure. Nails must be long enough to penetrate both the cap and underlying field shingles into the wood deck.
- Cover all exposed fastener heads on the final ridge cap with a neat bead of asphalt plastic cement.
Product Line Variations and Low-Slope IKO Shingle Installation Guidelines
Different shingle profiles have specific layout and handling requirements:
- IKO Crowne Slate: This luxury heavyweight line mimics natural dimensional slate tiles. It uses precise, multi-piece staggered alignment patterns and requires careful nail placement through thick laminated bands.
- IKO Armourshake: Featuring an intricate, staggered wood-shake appearance, Armourshake requires specialized starter components (such as Armour Starter) and a dedicated 2-course offset layout to achieve its rustic finish.
- IKO Dynasty: Equipped with the ArmourZone reinforced woven band, Dynasty allows high-speed fastening with wider target nailing zones and delivers 130 mph wind resistance using standard 4-nail patterns.
- Low-Slope Roof-Fast Membrane Systems: For slopes between 2:12 and 4:12 that use traditional low-slope roofing instead of standard field shingles, apply multi-ply self-adhering membranes (like IKO Roof-Fast) with a minimum 19-inch overlap to ensure complete watertight protection.
When you need an attractive, durable roof installed to precise manufacturer specifications across Beecher City, Effingham, Shelbyville, Altamont, Vandalia, Ramsey, Salem, Hillsboro, or Litchfield, IL, our team at Mid-State Construction & Roofing, Inc. provides factory-grade workmanship, rigorous quality supervision, and reliable project execution. Explore our expert residential roof installation services to schedule your inspection today.