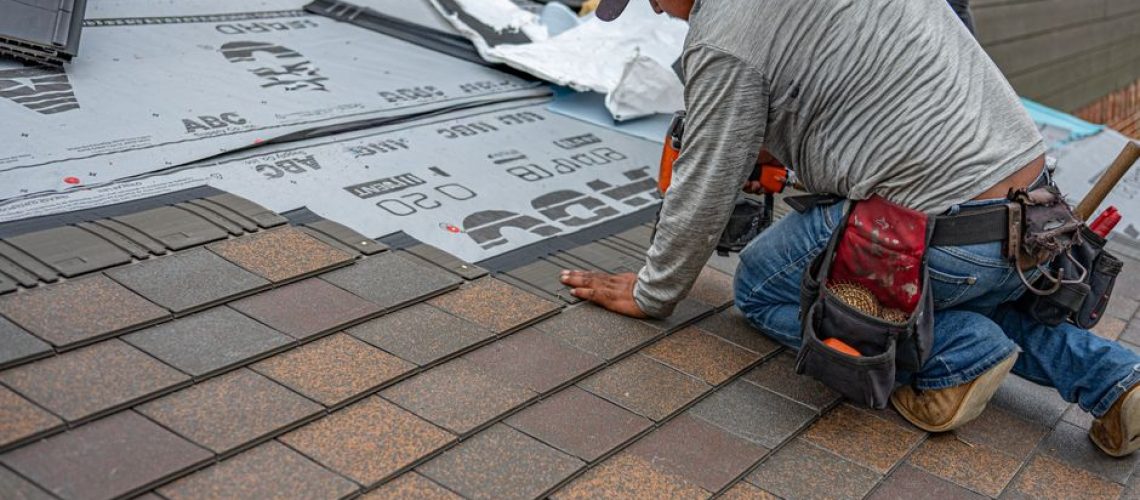
Step-by-Step Drip Edge and Step Flashing Installation
Understanding Drip Edge: Profiles, Materials, and Building Codes
For proper drip edge installation, fasten the metal flange directly to the roof deck beneath the underlayment along horizontal eaves, and install it over the underlayment along sloped gable rakes. Secure the metal with corrosion-resistant roofing nails spaced 8 to 12 inches apart on center, overlap adjacent sections by at least 2 inches, and ensure the starter shingles overhang the outer metal edge by 3/8 to 3/4 inch.
Installing perimeter metal creates a clean mechanical break that interrupts capillary action, preventing runoff from curling backward under shingle edges and soaking into exposed wood sheathing or fascia boards. In addition to directing water cleanly into gutter troughs, drip edge blocks wind-driven rain from penetrating the deck perimeter, reinforces shingle overhangs, and seals gaps against pests.
| Profile / Material Type | Key Characteristics | Best Use Cases | Pros & Cons |
|---|---|---|---|
| Type C (L-Style) | 90-degree bent metal angle | Basic retrofits, shed roofs, rakes | Simple to bend; lacks extended kickout projection |
| Type D (T-Style / D-Metal) | Formed with a lower outward kickout lip | Standard residential asphalt shingle roofs | Superior water deflection; preferred by industry standards |
| Type F (Gutter Apron) | Extended deck flange with long downward drop | Steep eaves, wide fascia coverage | Excellent coverage behind gutters; slightly bulkier |
| Aluminum | Lightweight, naturally rustproof (.024″ to .032″ thick) | Humid inland and residential applications | Will not rust, easy to cut; softer than heavy steel |
| Galvanized Steel | High structural rigidity (24 to 28 gauge) | High-wind regions, commercial edges | Rigid and strong; can corrode if cut edges lose coating |
| Copper | Premium architectural metal, natural patina | Historic restorations, slate or tile accents | Lifetime longevity, gorgeous finish; higher material cost |
Drip Edge Profiles and Material Selection
Choosing the right profile depends on your architectural layout. While Type C is a traditional 90-degree angle, organizations like the Asphalt Roofing Manufacturers Association prefer Type D (often called T-style or D-metal). The outward-projecting kickout on Type D pushes water further away from the wood fascia before the drop occurs. For eaves with tall gutters, Type F gutter aprons provide a longer vertical face that slides well down inside the back of the gutter trough.
When selecting metals, aluminum is the go-to standard for most residential homes across Effingham and surrounding Central Illinois communities due to its complete resistance to rust and ease of trimming. Galvanized steel provides enhanced rigidity against ladder contact and high winds, though field cuts should be clean to avoid raw steel exposure. For historic properties or high-end architectural builds, thick-gauge copper provides lasting durability and distinctive curb appeal.
IRC Building Codes and Manufacturer Warranty Standards
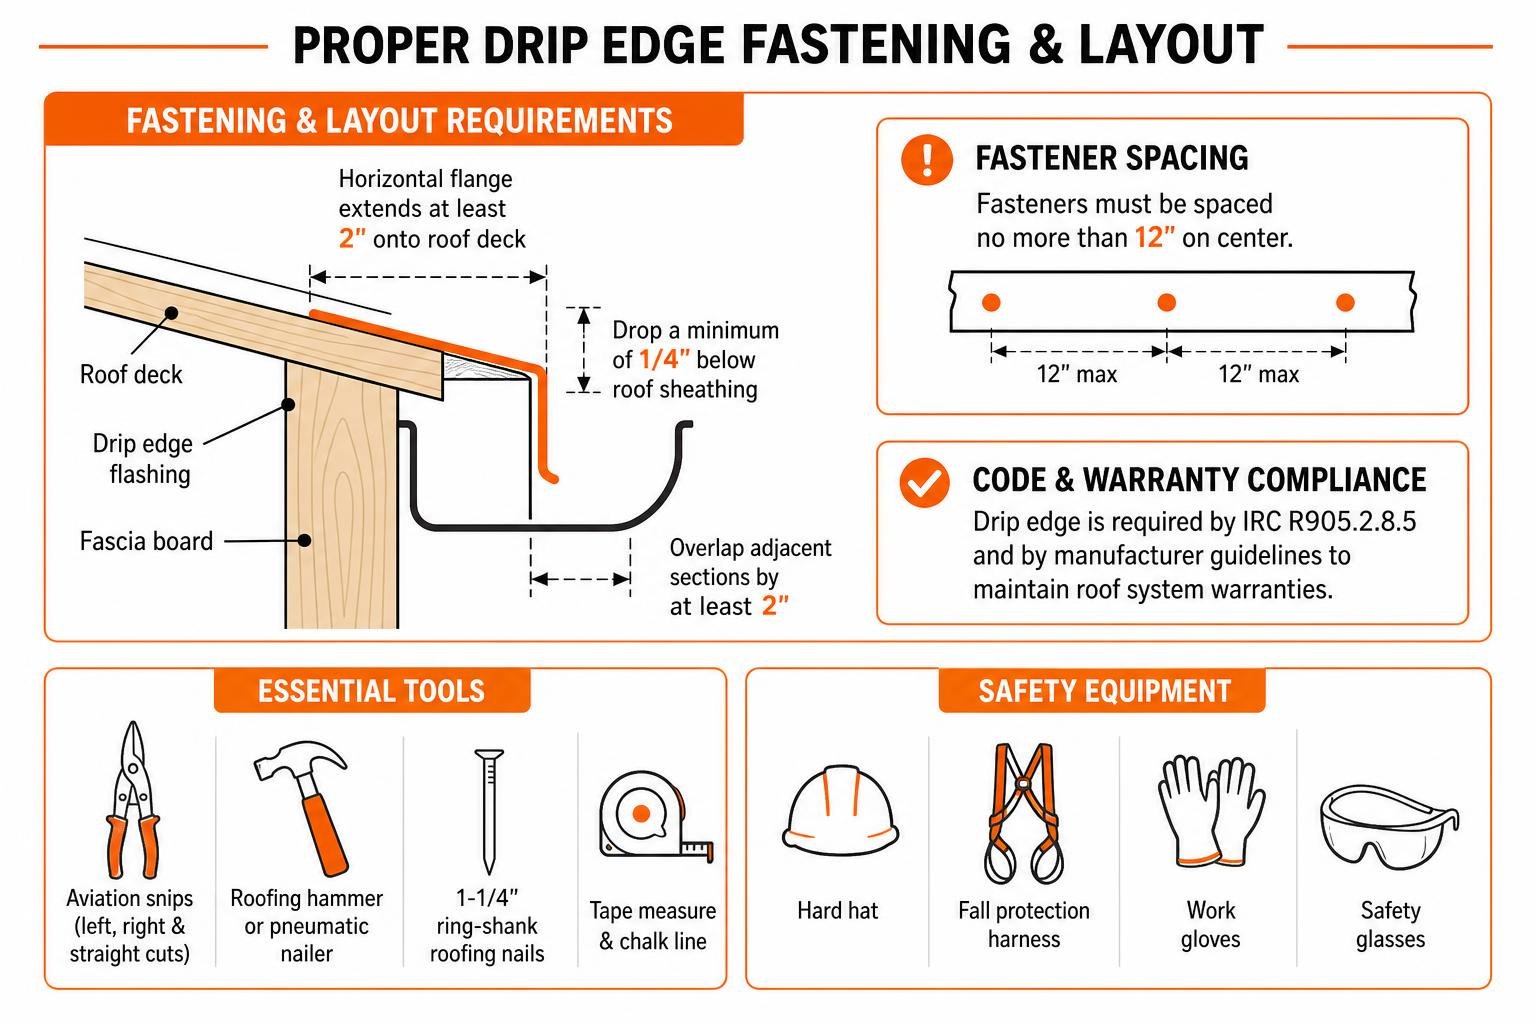
Drip edge is not an optional cosmetic accessory; it is a strict code requirement. Section R905.2.8.5 of the International Residential Code (IRC) mandates that corrosion-resistant drip edge flashing be applied to both eaves and gable rakes on shingled roofs. The code specifies that the horizontal deck flange must extend at least 2 inches onto the roof deck, drop a minimum of 1/4 inch below the roof sheathing, and overlap adjacent sections by no less than 2 inches. Fasteners must be spaced no more than 12 inches on center.
Beyond local building codes, adhering to ARMA guidelines on drip edge placement and major manufacturer specifications (such as GAF and CertainTeed) is essential to preserve your roof’s warranty coverage. Skipping edge flashing, face-nailing the vertical metal, or reversing the underlayment sequence at the eaves can void wind warranties and leave deck edges unprotected against seasonal storms.
Tools and Preparations for Drip Edge Installation
A successful metal installation begins with proper equipment and thorough deck preparation. Before climbing up, make sure your work area is organized and your roof deck is clean, flat, and sound.
Essential Tools and Safety Equipment
Working along roof edges presents fall hazards, so safety is paramount. Make sure you have the following gear ready:
- Cutting & Fastening: Aviation snips (left, right, and straight cuts), a standard roofing hammer or pneumatic nailer, and 1-1/4″ galvanized or stainless steel ring-shank roofing nails.
- Layout & Sealing: A 25-foot tape measure, chalk line, and a caulk gun loaded with high-grade, non-curing elastomeric roofing sealant.
- Safety Gear: OSHA-compliant fall arrest harness and roof anchor, safety glasses, cut-resistant work gloves, and a heavy-duty ladder equipped with a ladder stabilizer and leg levelers.
Roof Deck Preparation and Inspection
Before setting a single piece of flashing, inspect the perimeter sheathing. Remove all old roofing materials, pull remaining staples or nails, and look for signs of rot, soft OSB, or water staining along the fascia. Knowing what to expect when getting your new roof installed includes taking the time to replace any decayed decking rather than nailing new metal over compromised wood. The fascia boards should be securely nailed and aligned to provide a flat backing for the vertical drip edge flange.
Step-by-Step Guide to Drip Edge and Flashing Installation
Proper flashing installation relies on water-shedding sequence (often called the “shingle-lap” principle). Water flows downward, so every upper layer must overlap the layer beneath it.
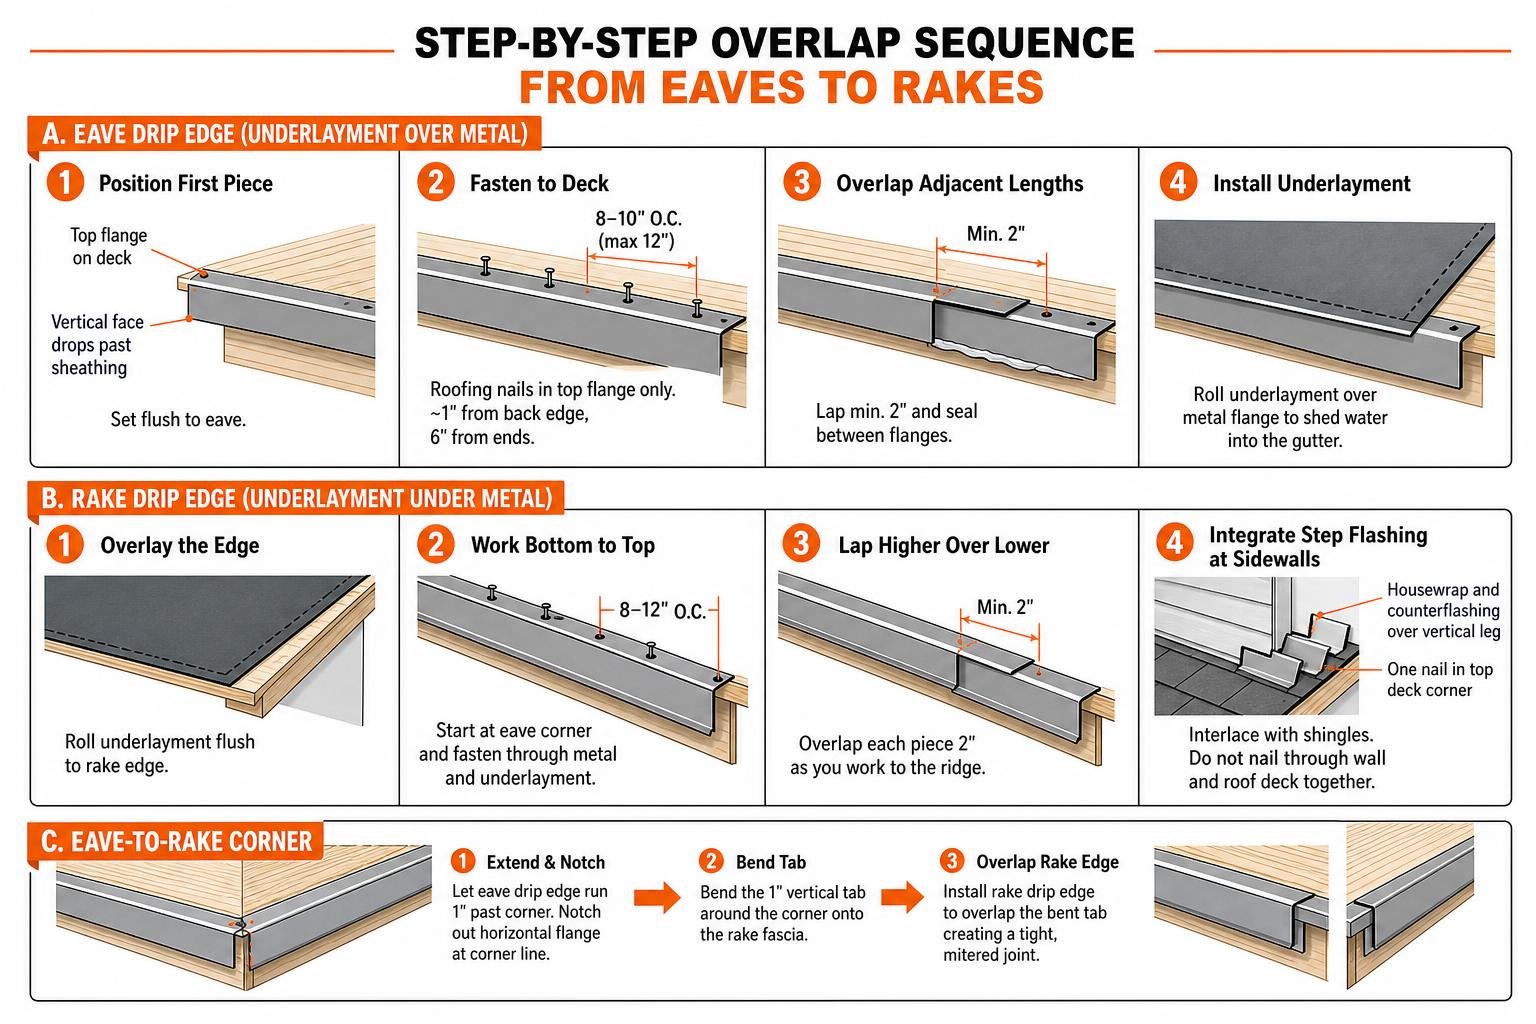
Proper Eave Drip Edge Installation Sequencing
At the horizontal eaves (the lower edges of the roof where gutters sit), the drip edge goes directly onto the bare wood sheathing underneath the underlayment.
- Position the First Piece: Set the metal section flush against the eave. The top horizontal flange rests flat on the wood decking, while the vertical face drops down past the sheathing edge.
- Fasten to the Deck: Drive 1-1/4″ ring-shank roofing nails through the top horizontal deck flange every 8 to 10 inches (never exceeding 12 inches). Keep fasteners roughly 1 inch from the back edge and at least 6 inches away from section ends. Never nail through the vertical face of the metal.
- Overlap Adjacent Lengths: When placing the next section, overlap the prior piece by a minimum of 2 inches. Apply a thin dab of roofing sealant between the overlapping metal flanges to prevent wind-driven moisture infiltration.
- Install the Underlayment: Roll your self-adhering ice-and-water barrier or synthetic underlayment over the installed metal deck flange. Covering the metal with these critical roofing underlayment layers ensures that any moisture reaching the underlayment drains harmlessly onto the metal and directly into the gutter.
Rake Drip Edge Installation and Step Flashing Integration
Along the sloped rake edges (the gable ends of the roof), the sequence flips. The underlayment is installed first, and the rake drip edge is installed over the underlayment.
- Overlay the Edge: Roll your underlayment flush to the outer rake edge.
- Work from Bottom to Top: Start installing rake drip edge at the lower eave corner and work upward toward the peak. Fasten the metal through both the deck flange and the underlayment every 8 to 12 inches.
- Lap Higher Pieces Over Lower Pieces: As you work toward the ridge, overlap each upper piece by 2 inches over the lower piece so water running down the slope sheds over the joint.
- Integrate Step Flashing at Sidewalls: Where the sloped roof intersects an adjoining vertical wall (such as a dormer or second-story siding), install individual 4″x4″ or 5″x5″ bent L-shaped step flashing pieces. Interlace each step flashing tin with consecutive courses of shingles, securing each piece with a single nail in the top deck corner. Cover the vertical leg with housewrap and counterflashing, never nailing through both the roof deck and wall framing with the same fastener.
Cutting Corners, Miters, and Overlapping Joints
Clean corner transitions prevent unsightly gaps and eliminate potential water entry points:
- Eave-to-Rake Corner: Let the eave drip edge run 1 inch past the rake corner. Cut a notch out of the horizontal deck flange right at the corner line. Bend the remaining 1-inch vertical tab around the corner onto the rake fascia. When you install the rake drip edge, overlap it on top of this bent tab, creating a tight, mitered metal joint.
- Roof Ridge Peak: When the rake metal reaches the roof peak, let the section extend roughly 1 to 2 inches past the ridge line. Cut away the vertical downward flange at the peak, score the top flange, and fold the excess metal neatly over the ridge onto the opposing slope. Overlap the opposing rake metal over this fold for a watertight finish.
Common Mistakes to Avoid and Inspection Checklist
Even high-quality materials will fail if small details are overlooked during installation. Keep an eye out for these frequent mistakes:
- Reversed Eave Layering: Nailing the eave drip edge over the underlayment creates an internal ledge that traps melting ice and running water beneath the roof deck, leading to hidden rot.
- Face-Nailing the Metal: Driving nails through the vertical face of the drip edge creates exposed leak pathways and buckles the metal as temperatures fluctuate.
- Insufficient Overlap: Lapping joints less than 2 inches allows wind-driven rain to blow beneath the metal seam.
- Tight Gaps at Eaves: Nailing drip edge hard against the fascia without checking gutter alignment can cause runoff to sheet down the back of the fascia board instead of into the gutter trough.
- Unsealed Deck Flaws: Ignoring rotted decking or rusted old nails beneath new metal invites premature structural sagging.
Catching these errors early prevents expensive repairs. Keep an eye out for telltale signs of roof damage and wood rot like peeling fascia paint, damp attic decking, or loose edge shingles. While basic visual checks can be done from the ground, scheduling a professional roof inspection provides a thorough assessment of your flashing transitions, deck fastening, and overall roofing health.
Frequently Asked Questions About Roof Edge Flashing
Can you add a drip edge to an existing roof without removing shingles?
Yes, retrofitting drip edge on an existing roof is possible, provided the first course of shingles and the underlying decking are in good condition. Use a wide, flat pry bar to carefully break the sealant bond and lift the starter shingle course. Gently pull any nails in the lower edge of the deck, slide the horizontal flange of the new metal drip edge under the underlayment at the eaves (or under the shingles along rakes), fasten the metal flange securely, and re-adhere the shingle tabs with quarter-sized dabs of roofing cement.
Does drip edge go over or under the underlayment?
The correct placement depends on whether you are working on an eave or a rake. At the horizontal eaves, drip edge goes under the underlayment directly against the deck sheathing. Along the sloped gable rakes, drip edge goes over the underlayment. For specialized metal assemblies, always verify exact flashing specifications, such as the Drexel Metals technical specifications, to ensure compliance with commercial and residential architectural standards.
How far should shingles overhang the drip edge?
According to manufacturer guidelines and ARMA recommendations, asphalt shingles should overhang the drip edge by a minimum of 3/8 inch to a maximum of 3/4 inch. Overhanging less than 3/8 inch can allow runoff to track backward under the shingle edge via capillary pull. Overhanging more than 3/4 inch leaves the shingle edge unsupported, making it vulnerable to breaking under snow loads or lifting in heavy Midwest windstorms.
Conclusion
A well-built roof is only as durable as its perimeter details. By selecting the right metal profile, fastening according to code, and following the correct eave and rake underlayment sequence, you establish a long-lasting barrier that keeps moisture out of your roof deck and fascia. Precision flashing work today prevents costly structural repairs years down the road.
When you need exceptional exterior craftsmanship, our team at Mid-State Construction & Roofing, Inc. brings dedicated project management, quality assurance, and high-performance materials to every job. Whether you are planning a full roof replacement or require professional flashing repair across Central Illinois, explore our expert Altamont roofing services to ensure your home remains completely protected in every season.