
The Homeowner’s Cold-Weather Guide to Ice Dam Prevention
Ice Dam Prevention Starts in the Attic
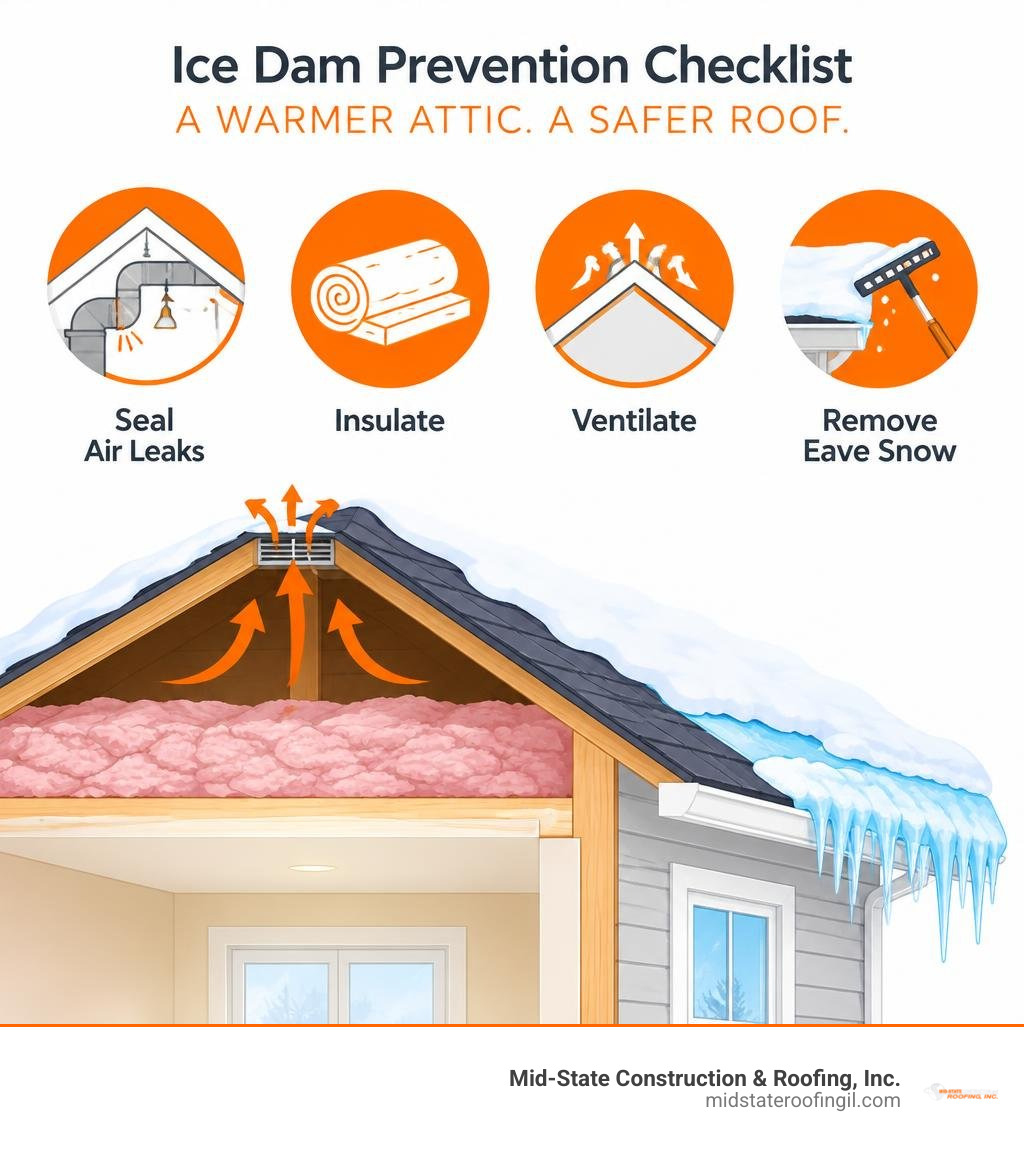
The most effective ice dam prevention is to keep heat from escaping into the attic and warming the roof. Before winter, focus on these steps:
- Air-seal gaps around attic hatches, light fixtures, pipes, and ducts.
- Add attic insulation to at least R-49; R-60 is a strong target for cold-climate retrofits.
- Keep soffit-to-ridge ventilation paths open with proper baffles.
- Rake snow from the lower 3 to 4 feet of the roof after heavy storms.
- Use heat cables or calcium chloride channels only as temporary help, not as the main fix.
An ice dam forms when snow melts on a warm upper roof, then refreezes at the colder eaves. That ice ridge traps later meltwater, which can work beneath shingles and cause ceiling stains, damaged insulation, mold, and rot.
I’m Virgil Strauch, a self-employed president from Beecher City, Illinois, with a background in strategic planning, operations, and practical problem-solving. That experience shapes this clear, homeowner-focused guide to ice dam prevention and the choices that protect a roof for the long term.
Understanding How Ice Dams Form and the Damage They Cause
Ice dams look like simple winter buildup, but they are actually the result of complex thermal dynamics occurring between your living space, attic, and roof covering.
Three specific ingredients are required to create an ice dam:
- Snow accumulation on the roof surface.
- Sub-freezing ambient outdoor temperatures (consistently below 32°F).
- A warm roof deck, caused by conditioned indoor heat escaping into an unconditioned attic space.
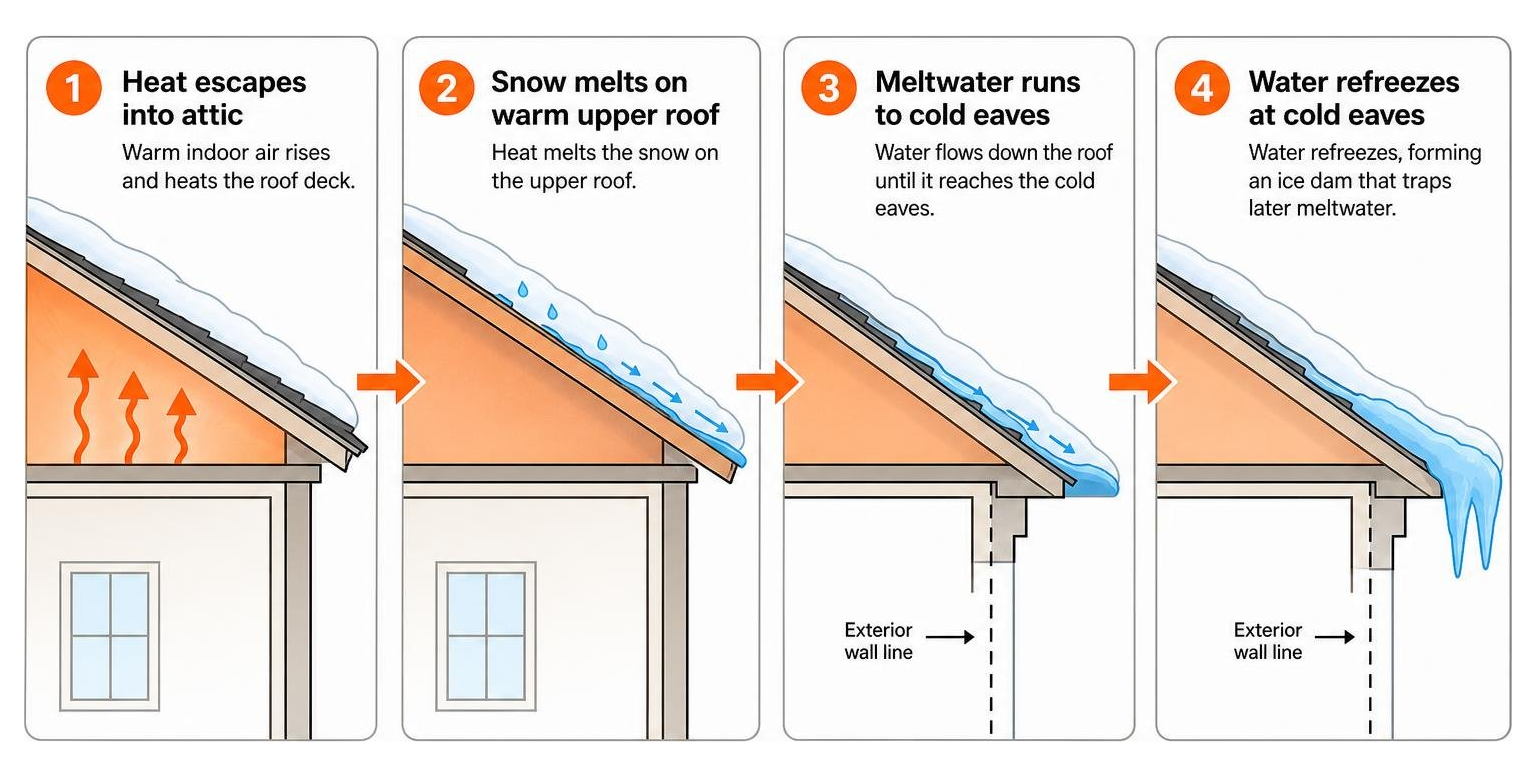
Indoor heat reaches the roof deck through three primary mechanisms: conduction through structural framing, radiation from uninsulated attic floors or ductwork, and convection via air leakage. Air leakage alone accounts for 40% to 60% of the total heat loss that triggers melting.
When rooftop snow gathers, it acts as an insulating blanket with a thermal resistance rating of roughly R-1 to R-2 per inch. As heat escapes through the ceiling plane, it warms the upper sections of the roof sheathing above 32°F. The snow touching the warm shingles begins melting, trickling down toward the eaves as liquid runoff.
Once this runoff passes the exterior wall line, it reaches the roof overhang—an area unaffected by attic heat loss that remains below freezing. The water refreezes instantly, building a thick ridge of ice along the edge of the roof.
Subsequent meltwater pools behind this frozen dam. Because asphalt shingles and standard lap-style roof coverings are designed to shed gravity-driven runoff rather than hold standing water, the liquid backs up under the shingle layers. From there, it enters nail penetrations, soaks the roof sheathing, drenches ceiling insulation, and damages interior drywall.
Catching these issues early through routine winter roofing checks helps identify thermal deficiencies before winter storms hit. You can review detailed scientific research on heat loss mechanisms and ice dam formation to see the physics behind these temperature differentials.
Early Warning Signs of Roof Ice Buildup
Recognizing the earliest warnings of an active or developing ice dam allows you to take action before water breaches your home’s interior envelope.
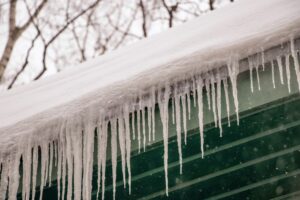
- Massive Icicle Formations: While a few small icicles are normal during sunny winter afternoons, thick curtains of icicles hanging directly from the fascia, soffits, or gutter edges indicate that snow is melting rapidly on the upper roof while refreezing at the cold perimeter.
- Ice Solidification in Gutters: Gutters packed completely solid with ice, causing the metal hangers to pull away or sag from the weight, are a classic sign of meltwater backup.
- Darkened Exterior Soffits: Water pooling behind an ice dam often seeps backward through exterior soffit vents and fascia boards, causing visible staining, peeling exterior paint, or dark watermarks.
- Interior Water Stains: Yellow, brown, or discolored spots expanding across ceilings or running down exterior-facing interior walls are definitive signs of meltwater entering the wall cavities.
- Moisture in the Attic: Frost collecting on roof nails, damp attic insulation, or soggy roof decking boards points directly to trapped humidity and active water entry.
Long-Term Ice Dam Prevention Strategies for Cold Climates
Treating the symptoms of ice dams on the outside of your roof is a short-term reaction; true prevention requires creating a “cold roof” assembly. The goal of cold roof design is to maintain the roof deck temperature as close to the ambient outdoor temperature as possible, preventing snow from melting from the underside.
Adhering to proven building science guidelines for cold-climate roof construction ensures your thermal barrier (insulation) and air barrier work together to prevent heat loss into the attic.
Attic Air Sealing as the Foundation for Ice Dam Prevention
Before adding a single inch of new insulation, you must eliminate convective air pathways. Air sealing is the most critical step in preventing ice dams because warm, buoyant indoor air carries substantial heat and moisture directly into the attic via structural bypasses.
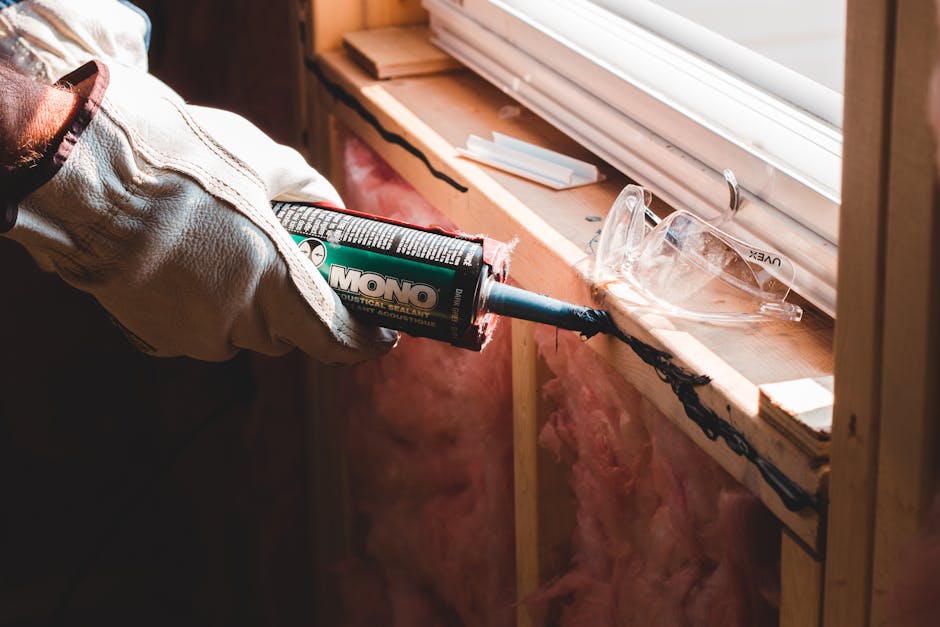
Focus air-sealing efforts on these primary trouble areas:
- Attic Hatches and Pull-Down Stairs: Weatherstrip the perimeter lip with durable closed-cell foam and attach rigid foam board insulation (R-10 or greater) directly to the back of the cover.
- Recessed Lighting Cans: Standard recessed lights act as chimneys for warm air. Replace old fixtures with airtight, IC-rated (insulation contact) LED enclosures, or build sealed drywall or rigid foam boxes over them in the attic, sealing the edges with fire-rated foam or caulk.
- Plumbing and Electrical Penetrations: Seal openings around plumbing vents, electrical wire chases, and ceiling fan junction boxes using one-part expanding polyurethane foam.
- Chimney and Flue Chases: Seal gaps between framing and masonry chimneys using sheet metal flashing secured with high-temperature, non-combustible silicone sealant.
- Top Plates: Spray expanding foam along the seams where the drywall meets the wooden top framing plates of all interior and exterior partition walls.
Upgrading Attic Insulation to R-60 Standards
Once the ceiling plane is completely airtight, upgrade your insulation to slow down conductive heat transfer.
For northern climates and areas across Climate Zones 5 through 8, the 2021 International Energy Conservation Code (IECC) sets a baseline minimum of R-49 for residential ceilings. However, the Department of Energy and leading building scientists recommend retrofitting to R-60 (approximately 16 to 20 inches of blown-in cellulose or loose-fill fiberglass) to stop heat transfer during extreme cold snaps.
- Blown-In Cellulose: Made from recycled paper treated with borates for fire resistance, blown cellulose provides roughly R-3.5 to R-3.8 per inch and fills irregularly shaped cavities and voids around framing members well.
- Blown-In Fiberglass: Provides approximately R-2.5 to R-3.2 per inch. It is lightweight, non-combustible, and will not settle significantly over time.
- Closed-Cell Spray Foam: Ideal for unvented, conditioned roof assemblies, cathedral ceilings, or tight eave spaces. It acts as both a high-performance insulation (R-6 to R-7 per inch) and a continuous air and vapor barrier.
Balanced Attic Ventilation and Baffle Installation
Insulation slows heat conduction, but proper ventilation purges any residual heat that reaches the attic space, keeping the roof deck cold.
A properly engineered passive ventilation system requires a balanced 1:1 ratio of intake air to exhaust air:
- Continuous Soffit Intake Vents: Allow fresh, sub-freezing outside air to enter at the lowest points of the eaves.
- Continuous Ridge Exhaust Vents: Allow rising air to escape along the peak of the roof.
To ensure incoming air moves freely over the insulation, install rigid plastic or cardboard insulation baffles (vent chutes) at every single rafter bay along the eaves. Maintain an unobstructed air space of at least 2 inches between the top of the insulation and the underside of the roof sheathing. This 2-inch gap exceeds older 1-inch minimum standards, providing the clearance needed to vent away heat and prevent moisture buildup.
Caution: Avoid mechanical or motorized attic exhaust fans in cold winter climates. Powered fans depressurize the attic cavity, pulling conditioned, warm air up through hidden house leaks and worsening ice dam formation.
Self-Adhering Underlayment and Ice Barrier Protection
Even the best-designed homes can encounter severe weather that leads to ice buildup. A resilient secondary defense is essential on the roof deck itself.
Section R905.1.2 of the International Residential Code (IRC) requires the installation of a self-adhering polymer-modified bitumen sheet (commonly known as ice and water shield) in regions with severe winter weather. This membrane must extend from the lowest roof edge to a point at least 24 inches inside the interior exterior-wall line.
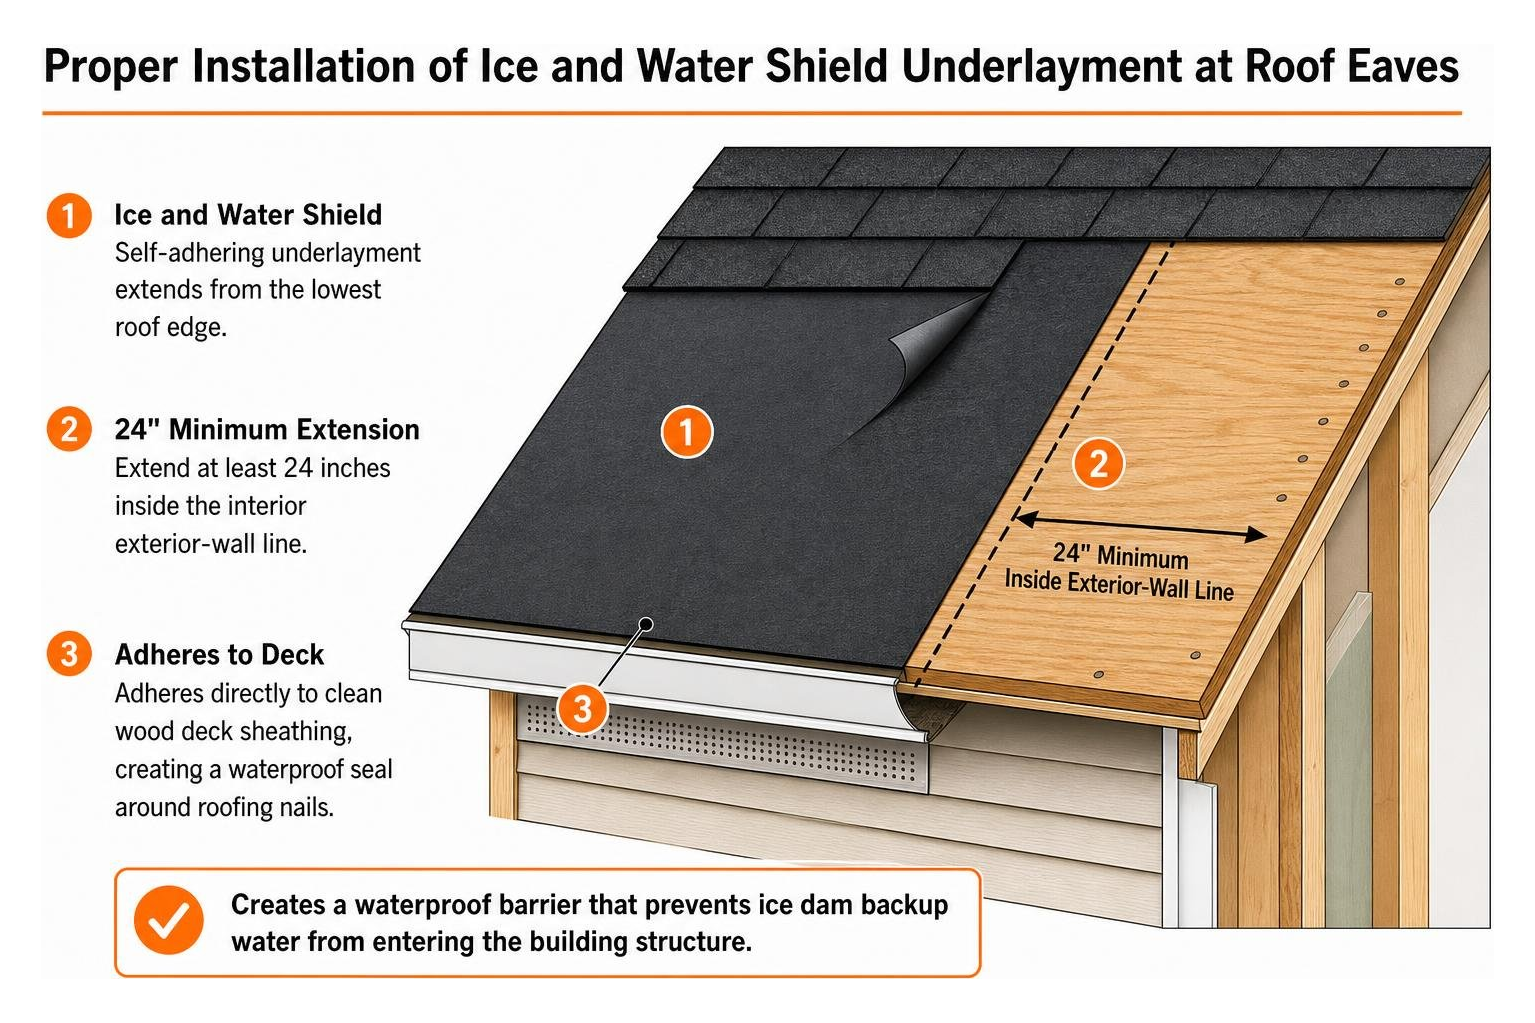
Ice and water shield adheres directly to the clean wooden deck sheathing, creating a waterproof seal around roofing nails. When installing a new roof, incorporating this premium protective roofing underlayment provides an impenetrable barrier that keeps backed-up water from entering the building structure.
Short-Term Fixes vs. Permanent Solutions
When freezing weather hits and an ice dam threatens your home, you may need a short-term solution while planning permanent building-envelope upgrades.
| Method | Upfront Cost | Longevity | Energy Impact | Primary Function |
|---|---|---|---|---|
| Air Sealing & R-60 Insulation | $1,500 – $8,000 | 25+ Years | Saves 15–25% on heating | Permanently stops root-cause heat loss |
| Soffit & Ridge Vent Balancing | $400 – $1,200 | 20+ Years | Lowers cooling/heating load | Maintains cold, uniform roof deck |
| Ice & Water Shield Upgrade | $300 – $700 (during reroof) | 25–30 Years | Neutral | Prevents interior leaks when dams form |
| Self-Regulating Heat Cables | $200 – $800 | 3–5 Years | Consumes 60–200W per linear foot | Melts drainage channels through active ice |
| Calcium Chloride Socks | $20 – $50 | 1 Season | Neutral | Melts emergency release channels |
| Roof Raking | $40 – $100 | Reusable tool | Neutral (requires manual labor) | Removes snow fuel before melting starts |
Evaluating Heat Cables and Roof Rakes for Ice Dam Prevention
Temporary approaches help manage snow and ice, but each comes with distinct trade-offs:
- Self-Regulating Heat Cables: These electric cables adjust their heat output based on ambient temperatures, zig-zagging along the eaves and running down gutters to melt drainage paths. While useful on complex rooflines where insulation cannot be added, they are a temporary patch. They draw significant power (costing $100 to $300 per winter in electricity) and do nothing to stop attic heat loss.
- Roof Rakes: Using an extendable aluminum roof rake from the ground to pull snow off the lower 3 to 4 feet of the roof is an effective DIY practice. Removing this snow eliminates the meltwater that feeds ice dams. Always choose a rake fitted with small roller wheels or protective bumpers to prevent scraping away shingle granules.
Safe Emergency Relief: Calcium Chloride Socks
If an ice dam has formed and water is pooling behind it, you need to release the trapped water quickly and safely.
- Fill a clean nylon stocking or porous cloth tube with pure calcium chloride ice-melt pellets.
- Tie the open end securely.
- Position the sock vertically across the face of the ice dam so it bridges from the trapped pool over the edge of the gutter.
- As the calcium chloride dissolves, it generates exothermic chemical heat, melting a vertical drainage channel through the dam.
- Trapped water will flow out through the channel, relieving hydrostatic pressure against the shingles.
Never use ordinary rock salt (sodium chloride). Rock salt corrodes aluminum gutters, leaves white mineral residue on shingles, and becomes ineffective once temperatures drop below 15°F. Calcium chloride remains chemically active down to -25°F without harming roof materials.
Dangerous Removal Practices Homeowners Must Avoid
Desperation can lead to dangerous removal tactics that cause more harm than the ice dam itself.
- Never Use Axes, Hammers, or Chisels: Hitting frozen shingles shatters the brittle asphalt matting, punches holes through the roof deck, and voids manufacturer warranties.
- Never Use Propane Torches or Open Flames: Applying open flame to cold shingles creates an immediate fire hazard and can ignite dry wood framing underneath.
- Never Use High-Pressure Power Washers: High-pressure water strips protective mineral granules from asphalt shingles, leaving the asphalt base exposed to UV breakdown.
- Never Walk on an Icy Roof: Walking on a slick, sloped, ice-covered roof during freezing weather carries severe safety risks. Always perform maintenance from the ground or hire experienced specialists.
Professional Intervention and Cost Considerations
If an ice dam is actively forcing water into your living space, call an emergency roofing crew. Qualified professionals use commercial low-pressure steam machines to eliminate the ice safely.
Unlike high-pressure washers, low-pressure steam melts through thick ice dams at high temperatures without using abrasive force, protecting the underlying shingle granules and flashings.
For long-term peace of mind, pair insulation upgrades with ongoing seasonal roof maintenance. If an emergency arises during severe winter weather, reach out for residential emergency roof repair to stop leaks and protect your home’s structural integrity.
Architectural Factors: Gutters, Roof Pitch, and Metal Roofs
Roof architecture and drainage systems directly influence how ice dams behave:
- Gutters and Downspouts: Gutters do not cause ice dams. An ice dam forms on the cold roof overhang whether gutters are present or not. However, gutters filled with wet, uncleaned autumn leaves hold onto moisture, freeze solid faster, and add heavy loads to the eaves.
- Roof Pitch: Low-slope roofs (under 4:12 pitch) are more vulnerable to ice dam leaks because meltwater drains slowly and can back up underneath shingles more easily. Steeply pitched roofs shed water faster, but still require proper air sealing and insulation to stop ice ridges from forming.
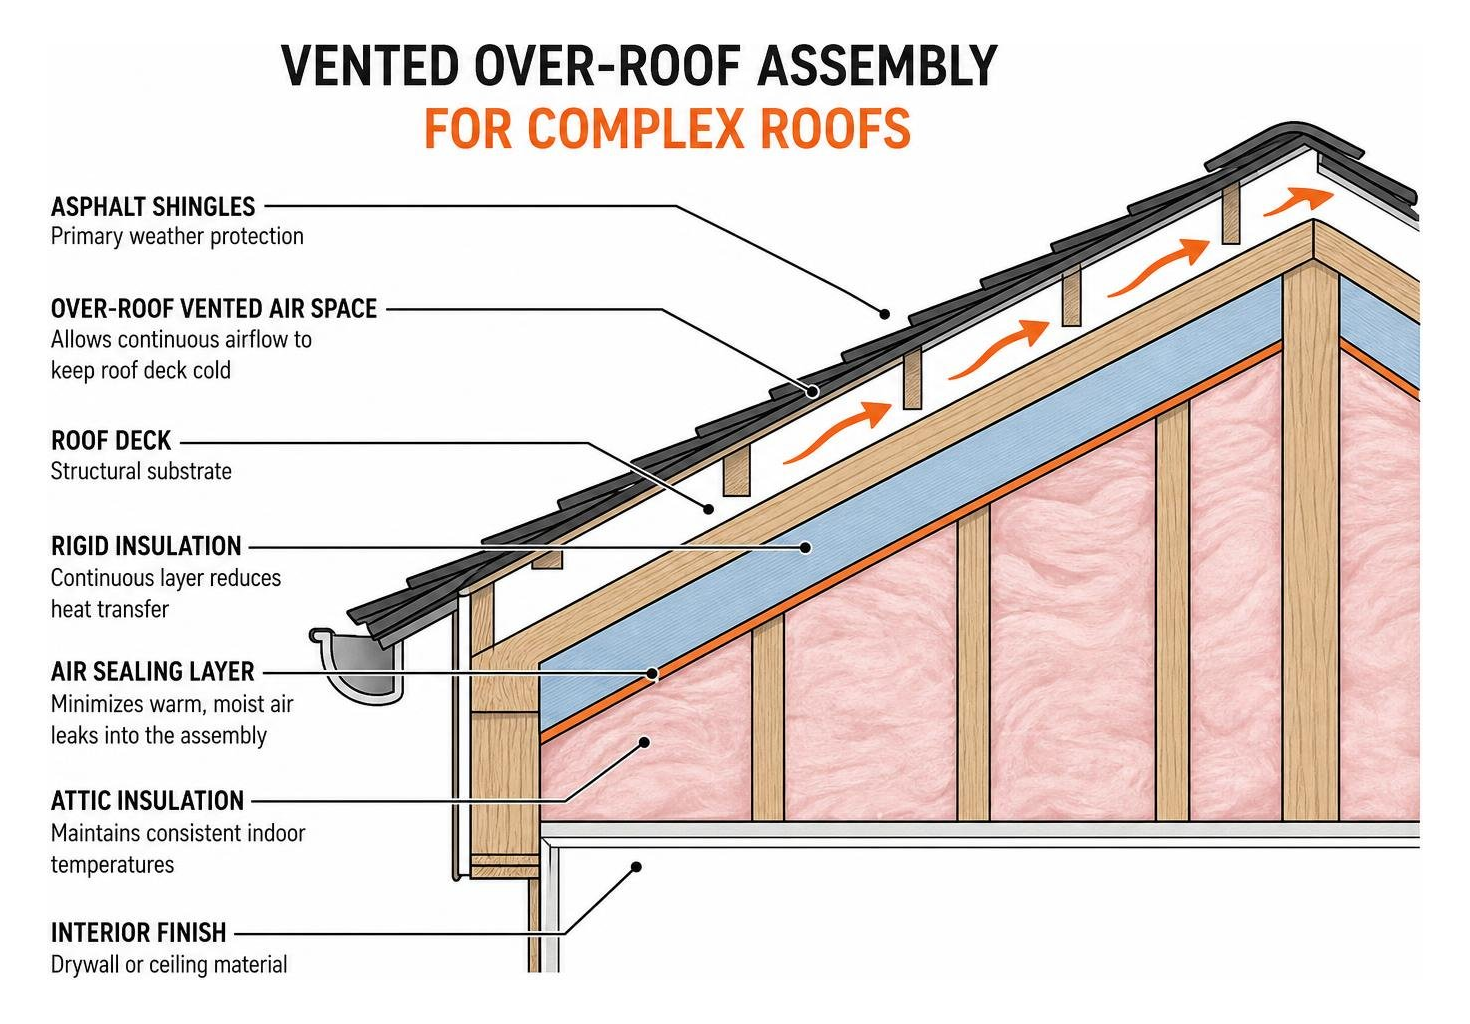
- Vented vs. Unvented Attics: Standard vented attics keep roof decks cold by circulating outside air. In homes with unvented cathedral ceilings or conditioned attics, continuous rigid foam or closed-cell spray foam insulation must be installed against the roof deck to eliminate thermal bridging.
Frequently Asked Questions About Ice Dams
Does homeowners insurance cover ice dam removal and damage repairs?
Most standard homeowners insurance policies cover sudden, accidental interior water damage caused by ice dams—such as ruined ceilings, damaged flooring, or soaked drywall.
However, policies generally exclude the cost of removing the ice dam itself, which insurers classify as preventable home maintenance. Always take clear photos and videos of the damage before clearing the ice to support your insurance claim.
Do metal roofs completely prevent ice dams?
While standing-seam metal roofs shed snow more easily than textured asphalt shingles and feature watertight, raised seams, they are not immune to the laws of thermodynamics.
If heat leaks into the attic, snow will melt, run down, and freeze at the cold eaves of a metal roof just as it does on shingles. The resulting ice block can tear off snow guards, bend metal panels, and back up behind low-profile valley flashings. Complete attic air sealing and proper insulation remain essential for metal roof systems.
How much does permanent ice dam prevention cost in 2026?
A comprehensive attic retrofit—including professional blower-door air sealing, ventilation baffle adjustments, and blowing in R-60 cellulose or loose-fill fiberglass across a standard 1,500 to 2,000 square foot attic—typically costs between $1,800 and $4,500 in 2026. More complex structural remediation or closed-cell spray foam applications can run up to $8,000.
Because proper attic insulation and air sealing stop substantial winter heat loss, most homeowners recover this investment within 5 to 9 winters through lower monthly utility bills.
Protect Your Roof from Winter Damage
Effective ice dam prevention relies on sound building science: sealing attic air leaks, upgrading insulation to R-60 standards, and balancing passive ventilation to maintain a cold, uniform roof deck.
Our team at Mid-State Construction & Roofing, Inc. brings dedicated project supervision, skilled craftsmanship, and quality assurance to every residential and commercial roofing project. If you are preparing your home for winter, schedule our comprehensive Altamont roof inspection and winterization services to secure your roof against cold weather before freezing temperatures arrive.