
Smart Ways to Diagnose and Fix a Leaky Ceiling Without Chaos
Immediate Emergency Actions: Safety and Containment
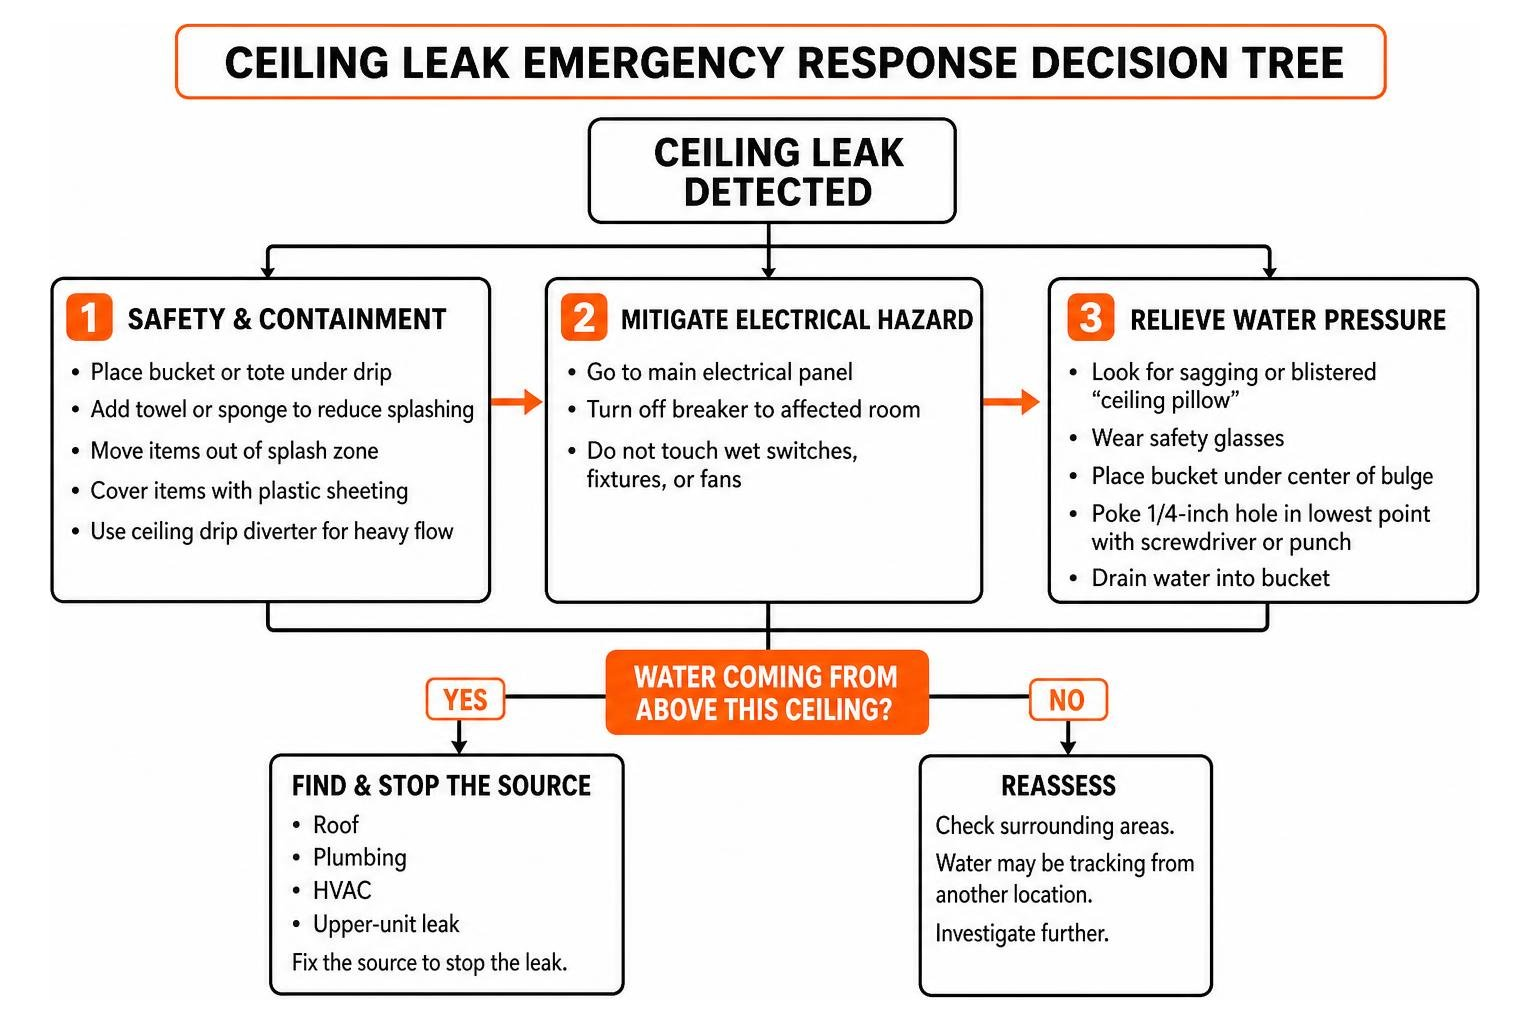
When water breaches your ceiling, the initial 30 minutes dictate whether you face a minor drywall patch or thousands of dollars in structural restoration. Water weight accumulates rapidly above gypsum boards; a standard sheet of drywall can hold gallons of pooled water before tearing free under the load.
Your first objective is containment and site protection. Place a sturdy bucket or plastic tote directly underneath the active drip. To prevent loud splashing that erodes your sanity (and spatters dirty water onto surrounding trim), drape a towel or place a sponge inside the bucket. Move area rugs, upholstery, electronics, and valuable furniture completely outside the splash zone. If moving large furniture is impossible, drape heavy-duty polyethylene plastic sheeting over the items.
In commercial environments or wide-open residential basements, a bucket might not cut it. Installing a ceiling drip diverter—a vinyl tarp with a threaded drain fitting connected to a standard garden hose—can route gallons of continuous run-off directly down a drain or out an exterior doorway while you address the root issue.
If weather has battered your home, following established emergency roof repair procedures quickly stabilizes the interior building envelope before framing timbers soak through.
Mitigating Electrical Hazards and Trapped Water Pressure
Water and home electrical circuits represent an immediate, life-threatening hazard. Water easily flows along ceiling joists into recessed light cans, junction boxes, ceiling fan housings, and down interior wall cavities into wall outlets.
- Cut the Power: Head straight to your main electrical panel and switch off the circuit breaker powering the affected room. Never touch a light switch, dimmer, or ceiling fan fixture that is wet or visibly dripping.
- Relieve Hydraulic Pressure: If your ceiling drywall shows a sagging, blistered, or water-filled bubble (often called a “ceiling pillow”), it is on the verge of a catastrophic blowout. Put on safety glasses, position a 5-gallon bucket below the center point of the bulge, and use a long screwdriver or drywall punch to poke a clean 1/4-inch hole directly in the lowest part of the sagging area.
- Control the Flow: Piercing the center focuses the drainage into a steady stream straight into your container, relieving hydrostatic weight from the framing and saving neighboring drywall panels from pulling loose at the fasteners.
Pinpointing the Source: Roof, Plumbing, HVAC, or Upper-Unit Leaks
Treating the visible stain without finding the source is what causes 31% of all ceiling leak callbacks. Water rarely travels in a straight vertical line; it frequently enters at one point, tracks along rafters, trusses, or copper pipe runs, and pools dozens of feet away at the lowest structural dip.
To pinpoint the true entry point, we utilize specific diagnostic tools and timing clues:
- Non-Invasive Moisture Meters: Pinless moisture meters measure relative moisture levels behind paint and drywall. Readings above 16% on drywall indicate moisture retention, while readings above 70% to 85% relative humidity inside wall cavities confirm ongoing, active intrusion.
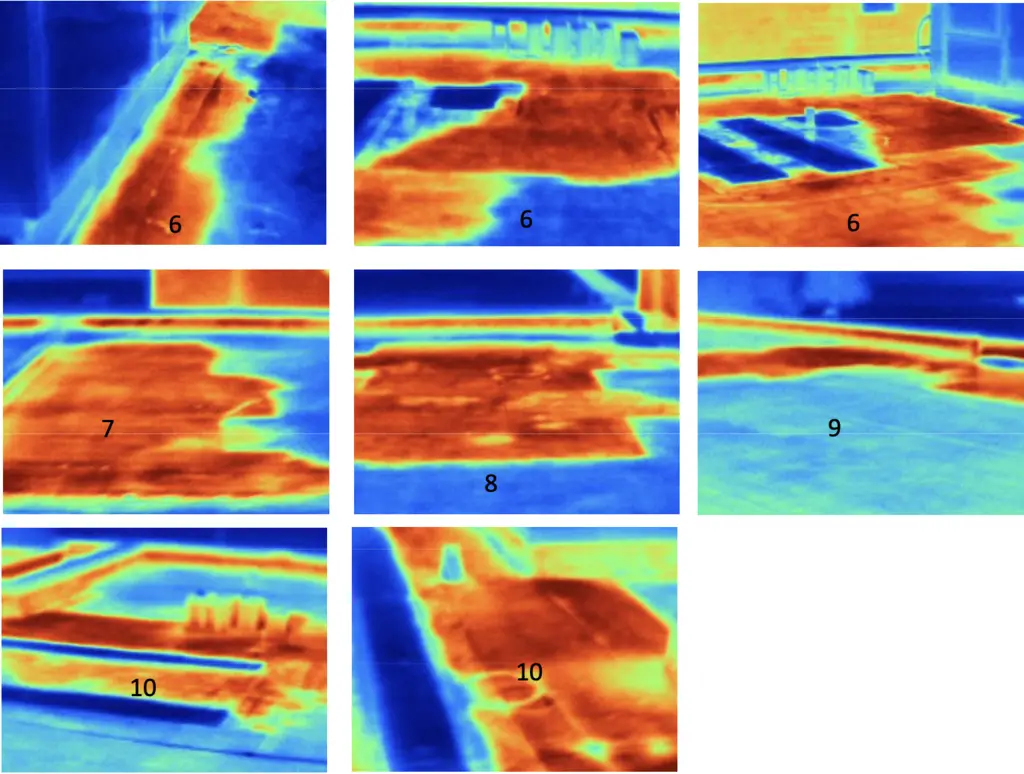
- Thermal Imaging (Infrared Cameras): Evaporating water cools surfaces rapidly. Thermal cameras highlight cool, blue-toned moisture plumes through structural assemblies without requiring destructive demolition.
- Acoustic Leak Detectors: Useful for pressurized water supply lines, these sensitive listening devices pick up the subtle hissing sound of escaping water behind framing.
- Timing Correlation: If water drips constantly at an unchanging rate regardless of weather or appliance usage, it points to a pressurized plumbing supply line. If it drips only during heavy downpours, wind-driven storms, or when snow melts, recognize the clear signs that you need an emergency roof repair to address roof shingles or flashing failures.
Plumbing vs. Upper-Floor Waterproofing Failures
In two-story homes and multi-family buildings, plumbing fixtures located directly above ceilings are prime suspects. It is vital to separate pressurized supply lines from gravity drain and waterproofing failures:
- Pressurized Supply Lines: Run constantly under 40 to 60 PSI of household pressure. A hairline crack or pinhole leak in a copper, PEX, or CPVC pipe produces an unrelenting, active flow.
- Drain Lines and P-Traps: Drips occur intermittently, precisely when a bathtub drains, a sink runs, or a washing machine discharges. A loose slip-nut on a P-trap or a cracked PVC drain hub will only leak under flow.
- Toilet Wax Rings: If water drips downstairs exclusively after a toilet is flushed, the wax gasket sealing the toilet horn to the closet flange has failed. A $10 wax ring replacement prevents thousands in joist rot.
- Wet Area Waterproofing Membranes: Failed tile grout and compromised subfloor membranes in showers account for 38% of ceiling leak cases. Bathroom floor waterproofing membranes have a standard service life of 8 to 15 years before thermal expansion and building movement compromise their seal.
HVAC Condensation and Climate-Specific Leak Triggers
Your climate dramatically impacts how and why ceilings leak:
- Hot, Humid Climates: Central air conditioning evaporator coils pull gallons of moisture from the air daily. If the primary condensate drain line clogs with algae or sludge, the auxiliary drip pan overflows directly into the attic or ceiling floor.
- Midwestern Storms & Freeze-Thaw Cycles: In regions with severe winters and stormy spring seasons, ice dams form at cold eaves, backing water upward under the shingles. Hail damage, wind-lifted shingles, and deteriorated chimney flashings allow storm moisture to penetrate the decking. Homeowners can read about how storm damage causes roof leaks to understand the vulnerable breach points across their roof structure.
Step-by-Step Ceiling Water Leakage Solution and Restoration Process
Once you contain the emergency and isolate the origin point, systematic restoration ensures the water never returns and mold cannot take hold. Preventative care begins well before problems arise, making the importance of routine roof inspections paramount for catching minor penetrations before they destroy ceilings.
Follow this structural repair workflow:
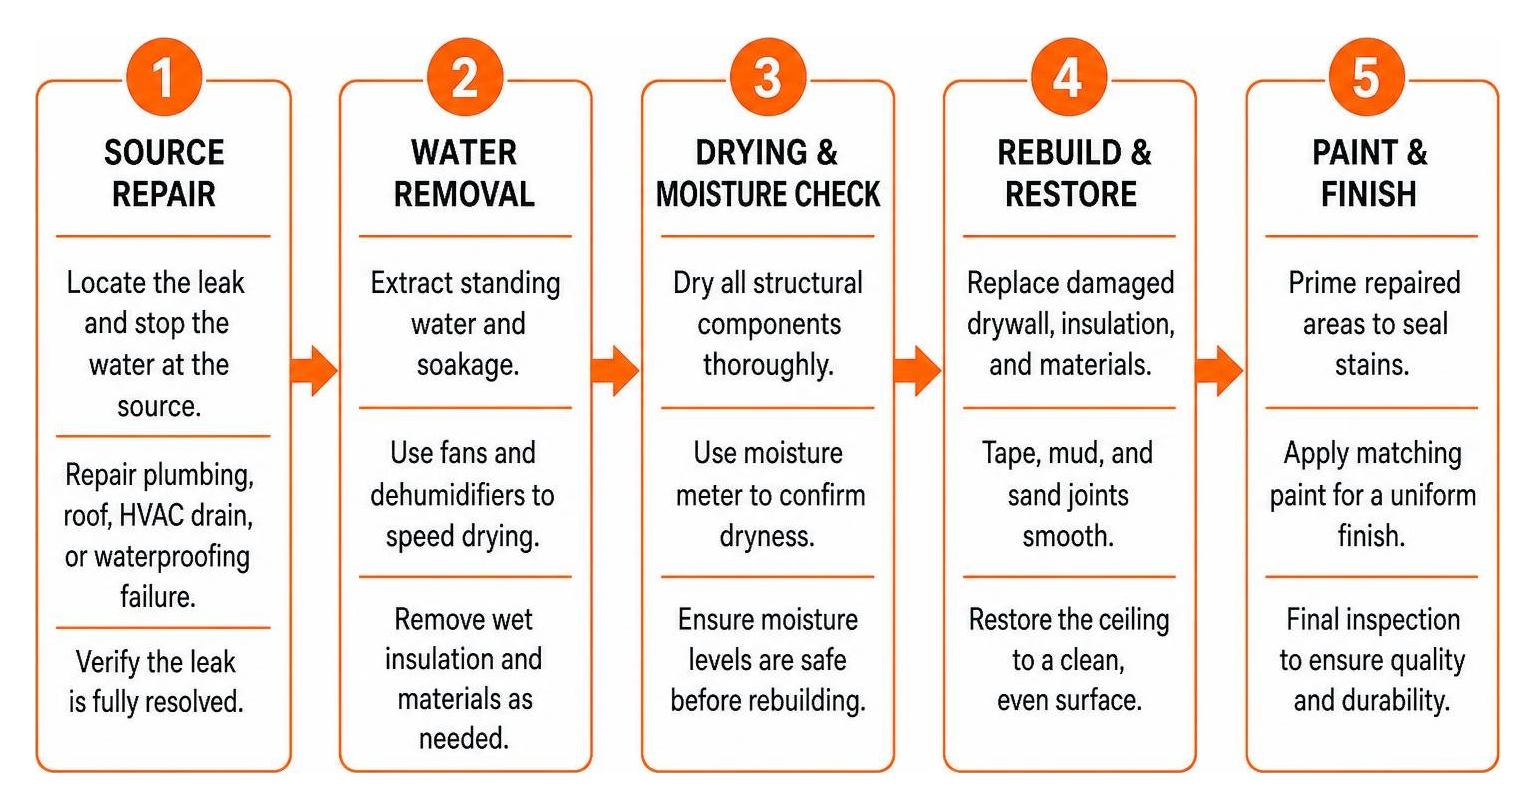
Overhead Pipe Repair: Press Fittings vs. Push-Fit vs. Solder
When an overhead copper pipe springs a leak in a cramped ceiling joist cavity, selecting the right connection method is crucial for safety and long-term durability:
| Pipe Repair Method | Pros | Cons | Best Use Case |
|---|---|---|---|
| Press Fittings | No open flame; works on wet pipes; permanent mechanical seal; fast installation | Requires specialized pressing tool | Tight overhead ceiling cavities near wood joists & insulation |
| Push-Fit Fittings | No special tools required; quick installation; joins copper to PEX easily | Relies on internal O-rings; bulkier profile; higher material cost | Fast emergency fixes; temporary connections; DIY accessibility |
| Soldered Copper (Sweating) | Lowest material cost; time-tested permanent joint; slim fitting profile | Extreme fire hazard from open flame in confined joist spaces; pipe must be completely dry | New construction or fully opened framing with zero combustible hazards nearby |
In confined attic or ceiling spaces packed with dry wood framing and blown-in cellulose or fiberglass insulation, press fittings provide a flameless, code-compliant connection without putting your house at risk of a torch fire.
Drying Protocols to Prevent Mold Growth within 48 Hours
A ceiling leak is an urgent event: mold spores begin germinating within 24 to 48 hours in damp cellulose materials.
Drywall can only be dried in place if the water source is clean (Category 1 water from supply pipes or rain), the drywall remains structurally rigid without sagging, and active mechanical drying starts within 48 hours. Follow industry drying parameters:
- Strip Saturated Insulation: Wet fiberglass or cellulose sitting on top of ceiling drywall acts like a wet sponge, trapping moisture against the upper face of the sheetrock. Cut small inspection access holes from below or enter the attic above to remove and discard all wet insulation.
- Deploy High-Velocity Air Movers and Dehumidifiers: Position commercial axial air movers to blow warm air across the ceiling surface. Pair them with a refrigerant or desiccant dehumidifier to pull moisture from the ambient air, dropping relative humidity in the room below 40%.
- Verify Dryness Targets: Do not rely on touch. Use a calibrated moisture meter to verify that gypsum board moisture is at or below 16% (ideally under 12%) and underlying structural wood framing is below 15% moisture content before beginning any cosmetic repairs.
Drywall Repair, Stain-Blocking Primer, and Seamless Repainting
Never patch or paint over wet drywall. Once the cavity is bone-dry and verified with a moisture meter:
- Cut Out Damaged Sections: Using a sharp drywall jab saw, cut a square or rectangular opening around the damaged drywall, extending back to the center of the nearest ceiling joists to give your replacement drywall a secure fastening point.
- Install Support Blocking and Patch: Screw 2×4 wood backing blocks along open edges if necessary. Cut a matching piece of drywall (matching the existing 1/2-inch or 5/8-inch thickness), secure it with 1-1/4 inch coarse drywall screws, and apply fiberglass mesh tape over all seams.
- Compound and Texture: Apply three thin coats of all-purpose joint compound, feathering each coat outward 8 to 12 inches past the joint. Sand smooth between coats using 150-grit sandpaper. Match the ceiling texture using aerosol spray knockdown, orange peel, or a roller stipple method.
- Apply Stain-Blocking Primer: Standard water-based latex primers will not stop water stains—the dried mineral salts will bleed right through new paint within weeks. Apply an oil-based or shellac-based stain-blocking primer over the repair and the water rings.
- Topcoat: Apply two coats of high-quality flat ceiling paint across the whole ceiling plane for an invisible, seamless blend.
DIY vs. Professional Ceiling Water Leakage Solution: When to Call the Experts
While minor plumbing fixes (like replacing a sink drain washer) and small drywall patches under 6 inches are safe DIY projects, certain scenarios require professional intervention:
- When to Call a Professional Roofer or Plumber: If the leak involves main plumbing lines, structural roof trusses, extensive sagging across multiple drywall panels, or if the leak persists during rain storms, consult a specialist. When selecting a contractor, focus on hiring a local roofing contractor for ceiling leaks with verified credentials and solid warranty backing.
- When to Call Certified Water Restoration Pros: If sewage (Category 3 black water) is involved, if water ran unnoticed for days, or if visible black mold clusters appear across the ceiling framing, professional containment under negative air pressure is necessary.
Repair Costs, Insurance Documentation, and Future Leak Prevention
Ceiling leaks run the gamut from simple fixes to major rebuilds. Knowing the typical costs helps set expectations:
- DIY Cosmetic and Pipe Patch: $50 to $200 (covers fittings, mesh tape, joint compound, and shellac primer).
- Professional Plumbing Repair + Drywall Reinstatement: $500 to $2,500 on average.
- Major Roof Leak Repair & Structural Framing Remediation: $1,500 to $5,000+.
According to data from the Insurance Information Institute, water-damage and freezing claims average about $15,400, accounting for 22.6% of all homeowner property losses.
Calculating Repair Costs and Filing Water Damage Claims
Homeowners insurance generally covers water damage that is sudden and accidental (such as a burst copper supply pipe or tree limb puncturing a roof during a thunderstorm). It routinely excludes gradual damage resulting from deferred maintenance, long-term continuous weeping, or neglect.
To give your claim the best chance of full approval:
- Document Everything First: Before cutting open drywall or tearing out soggy carpets, take wide-angle photos, close-up videos of dripping water, and timestamped logs of all actions taken.
- Keep the Failed Components: Do not throw away cracked pipe fittings, split supply hoses, or rusted valves. Adjusters often ask to inspect the failed part.
- Log Moisture Readings: Maintain a written record of moisture meter levels across consecutive days during structural drying.
- Coordinate Roofing & Structural Estimates: If storms caused the intrusion, review the details on navigating roof insurance claims before meeting with your assigned insurance adjuster.
Preventative Maintenance to Stop Future Ceiling Leaks
Preventing leaks is far less disruptive than drying out waterlogged ceilings. Incorporate these tasks into your home maintenance schedule:
- Clean Gutters and Downspouts Twice Annually: Overflowing gutters back water underneath drip edges and roof fascias, driving moisture straight into exterior overhangs and interior ceilings. Read our guide on essential seasonal roof maintenance tips for comprehensive exterior checklists.
- Insulate Exposed Pipes: In unconditioned attics and crawlspaces, fit closed-cell foam insulation jackets over supply pipes to eliminate condensation drips in summer and prevent freeze-bursts in winter.
- Inspect Roof Penetrations and Shingles: Inspect chimney flashings, plumbing vent boots, and skylight seals annually. Learn more about spotting roof damage before leaks start to catch small cracks before rain reaches your drywall.
- Flush AC Condensate Lines: Pour a cup of distilled white vinegar down your primary AC condensate drain line every 90 days to prevent algae mats and slime build-ups from overflowing the attic drain pan.
Frequently Asked Questions About Ceiling Water Leaks
How can I tell if a ceiling leak is coming from the roof or indoor plumbing?
Pay close attention to when the leak occurs. If the leak is continuous and drips at a steady rate 24/7, it points to a pressurized plumbing supply pipe. If the dripping happens only during or immediately after rain, heavy wind, or snow accumulation, the issue is roof-related. If the drip occurs only when someone drains a bathtub, runs a shower, or flushes a toilet upstairs, inspect the drain assemblies, P-traps, or toilet wax ring.
Can I simply paint over a water stain on my ceiling?
No. You should never paint over a water stain until you have identified the source, made a permanent structural repair, and confirmed that the drywall substrate has completely dried (moisture meter reading below 16%). Furthermore, standard water-based latex paint will not hide water stains; mineral tannins will bleed straight through. You must apply a dedicated oil- or shellac-based stain-blocking primer before applying your ceiling topcoat.
What is the best permanent ceiling water leakage solution for an aging roof?
If your ceiling leak originates from an aging residential or commercial roof showing widespread granule loss, cracked underlayment, or failing seams, spot repairs may only offer a temporary reprieve. A professional roof inspection will determine whether local flashing replacements, targeted membrane patches, or a full system replacement will deliver long-term protection. Review our guide on identifying when a roof needs repair or replacement to weigh your options.
Conclusion
A leaking ceiling demands calm, rapid action: cut electrical power to the affected zone, relieve water pressure by puncturing sagging bulges, and find the real source before spending money on cosmetic drywall work. Whether the issue stems from an upstairs P-trap, a clogged AC line, or storm-damaged roof flashings, addressing the root cause and verifying total structural drying preserves your home’s integrity and prevents dangerous mold blooms.
At Mid-State Construction & Roofing, Inc., we believe in doing every job right the first time. Our industry-leading training, rigid quality assurance, and dedicated project supervision ensure your roof keeps moisture outside where it belongs. Serving Effingham, IL, and surrounding communities including Beecher City, Shelbyville, Altamont, Vandalia, Ramsey, Salem, Hillsboro, and Litchfield, we deliver expert commercial and residential roofing repairs, replacements, and routine maintenance you can depend on.
Need help finding or stopping an overhead roof leak? Connect with our experienced team at Mid-State Construction & Roofing, Inc. to schedule a comprehensive roof inspection today.